Flavored salts are an excellent way to make use of some of the wild spices that are available to intrepid gatherers. Various fruits, cones, nuts, mushrooms and leaves can be used, anything that can be dehydrated and combined with salt. This often helps preserve more unstable wild spices, and prolongs the life of their flavor beyond the season of their emergence. A good example of this would be hemlock salt, in which the green cones of Eastern Hemlock are combined with salt to preserve the unique, robust, citrus-y flavor they possess in their green state.
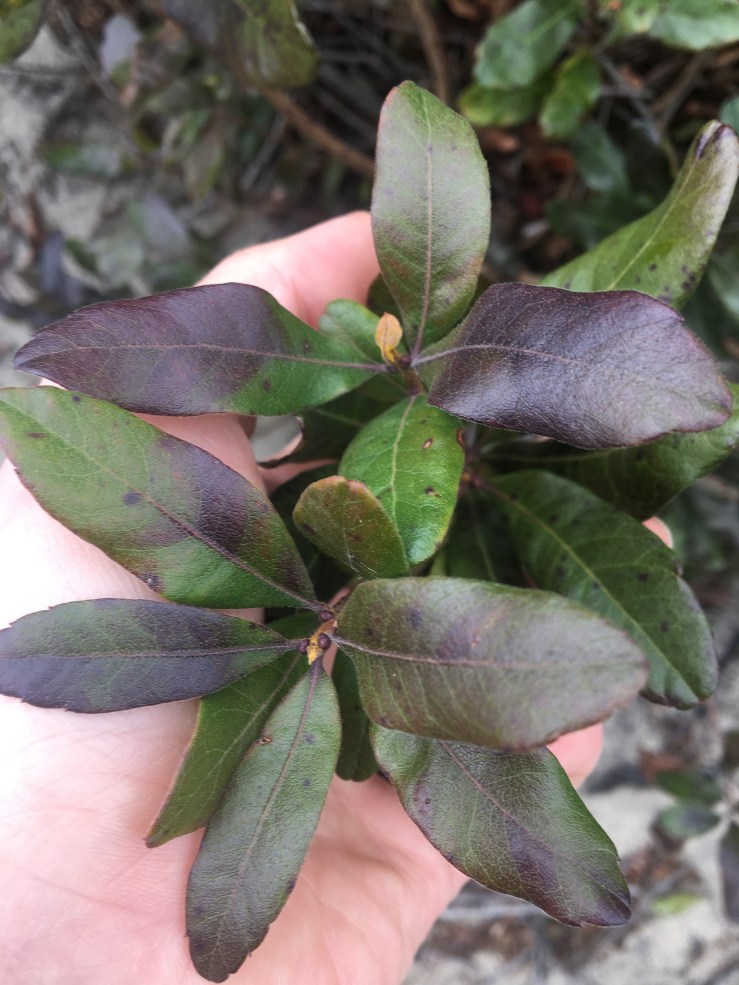
Bayberry leaves are available almost year-round, so preserving them isn’t at a premium. The leaves do tend to grow dark and unappealing in winter, although they may linger on late in warm winters or coastal locations (see photo below). The leaves of Myrica pensylvanica and other Myrica species are often mentioned in field guides and foraging books as a substitute for bay leaves (i.e. the Laurel Bay, Laurus nobilis). While this is certainly an option, I’m not a huge fan of “substitution” as a principle for utilizing wild food. I would prefer to exploit the flavors of the ingredient itself and craft recipes that reflect that flavor.
To my taste buds, Myrica leaves have a more complex and “bright” flavor than Laurel bay, with a less pronounced potency. In other words, if you’re substituting for Laurel leaf in a recipe, double up the amount of Myrica leaves used. If you are just enjoying them on their own merits, the following seasoning salt is a far more effective method. This is one of my go-to salts, perhaps the go-to salt, although juniper, black trumpet, roasted tomato and hemlock salts all get an enthusiastic nod for adding to dishes in lieu of ordinary sea or kosher salt. But bayberry leaf salt seems to be the crown prince of them all, serving as a final sprinkle to dishes instead of salt and pepper, but also being used in recipes themselves. In spring I roast whole chickens sprinkled with bayberry salt, after slipping pushki leaves under the skin. In the fall, grilled mushrooms and onions explode with flavor given a simple dusting of the stuff. You get the picture.
Grind together in a food processor :
6 cups bayberry leaves, dried
1 cup salt, preferably sea salt
Store in a well-sealed glass jar at room temperature. Lasts at least one year.
Some Northern Bayberry still clinging on in a coastal location in January.
Curry powder always seemed to me a shabby thing to buy, it being so much more interesting to work with the whole spices themselves. I was spurred on by one of the first cookbooks I ever bought, a collection of recipes and information about spices published to sell the goods of a local spice importer. By understanding the spices individually, I was able to experiment with them culinarily, adding more or less to a mix depending on what I intended to do with them. Cardamom and cloves, for instance, could be added if I was using a mix to spice tea or desserts with. I would add more dried curry leaves and turmeric when making a mix for fish.
When I began to seriously incorporate more of the native and invasive wild spices of the world of wild food, it wasn’t a great stretch of the imagination to start to envision a masala or curry mix made entirely of foraged aromatics. And while an excellent entirely wild curry mix can be made, I usually find that I miss the cumin acutely. For day to day use and especially when replacing imported curry powder in traditional recipes, I have settled on a curry mix that is “nearly wild,” relying only mainly on foraged ingredients. It is also quite flexible, and may be adapted, altered or expanded by anyone who uses it, with many replacements or omissions possible. I believe it can be used in most temperate climates without too much trouble, assuming the availability of traditional imported spices to replace what cannot be foraged.
I have omitted any turmeric or substitute for turmeric in this recipe. To many, the taste and color of curries cannot be separated from that spice. Now that organic fresh turmeric is much more widely available, I use it in these curries, when it can be added at the time of cooking. You may wish to add that or the powdered form to affect a more traditional coloration. I sometimes add annatto seed instead for “local color,” but of course the color is a different one. Below is the recipe, see notes after the recipe for information on substitutions. I have deliberately split the list of ingredients into three groups.
Combine :
1 ) essential bases
1 tbs. black mustard seed (wild or domestic)
1 tbs. cumin seed
1 tbs. wild parsnip or pushki or coriander seed
1-2 tsp wild carrot seed (optional, omit if using coriander seed)
2) optional aromatics
2-3 northern bayberry leaves or 1-2 bay leaves or 8 curry (kari) leaves
1-2 magnolia buds, dried or pinches of magnolia leaf or 1 clove
1 tsp american juniper berries or 1/4 tsp european juniper
1-3 eastern hemlock cones
3) “hot” or piquant aromatics
1-2 tsp prickly ash berry or sichuan peppercorn
1-3 tsp waterpepper seeds (or 1/2-1 tsp black peppercorns)
1-2 tsp chile flakes or 1-3 small dried hot chiles
Combine all the above in a heavy pan and heat over low to medium heat, tossing every thirty seconds or so, until the spices are toasted and fragrant. You can also store the mix, combined and use as whole spices in pickles or broths, or toast and grind it to order, which will give the best flavor. My only advice would be to use the whole recipe when grinding or using to infuse, as the many different-sized and shaped ingredients tend to separate themselves in the jar.
The trinity of mustard-cumin-wild parsnip is essential to this mix, nearly everything else can be omitted or varied. If using domesticated mustard seed, the variety to use is the brown or black mustard seeds preferred in Indian cuisine. Wild mustard genera which produce seeds that can be used for this include Brassica, Lepidium, Barbarea, Thlaspi, etc. Wild parsnip or pushki (Heracleum maximum, other edible Heracleum species can be substituted) seed, along with wild carrot seed all bear some resemblance to family member coriander. Pushki and wild parsnip have a drier, earthier flavor to them while wild carrot is spicier and lightly citrus-y. Always remember to avoid wild carrot seed if pregnant or desiring to become so–while I doubt that the small amount involved would have much effect unless consumed in massive quantities, wild carrot seed is traditionally considered an abortifacient.
The second group of aromatics are all wild but any can be omitted or substituted with the imported spices listed, with the exception of hemlock cones, which really have no parallel. If there is one wild spice in this group that I would strongly recommend investigating (and not replacing with allspice, which is a paltry substitute), it is spicebush. Native to the eastern US, it is a native understory tree which produces a green berry in summer that matures to a deep red in autumn. It is resinous and pungent and can be used ripe or unripe, fresh or dried. It has become inseparable from various curry mixes and is the most distinctive background player in this recipe, in my opinion.
Heat can be regulated by adjusting the last group of ingredients, which is in part why I have left a range for those items. I would describe this mix as moderately spicy, but not extremely so, even if using the larger numbers and including all three hot items. For a heavier spice, simply add more of whichever piquant aromatic you prefer.
This is an eminently simple preparation, adapted from a traditional German recipe. My eternal thanks to Steffi / Sycamore Spirits for translating this and many other recipes for me from a cookbook brought to the states with her from Germany. Though acorns are considered largely a famine food in most of Europe, they aren’t really thought of as food at all here in the US, even though they formed a substantial part of the diet of many early settlers.
For me, there is likely no more significant wild food in my diet than acorns. Not perhaps, in terms of quantity – but in terms of importance. I look forward with great eagerness to harvesting acorns in the fall, for while time-consuming it is a supremely relaxing activity. Processing acorns, too may be an exhaustive activity but it pleases me to no end, and there are few wild food products I treat with more reverence than a jar of pickled acorns or a tub of acorn flour.
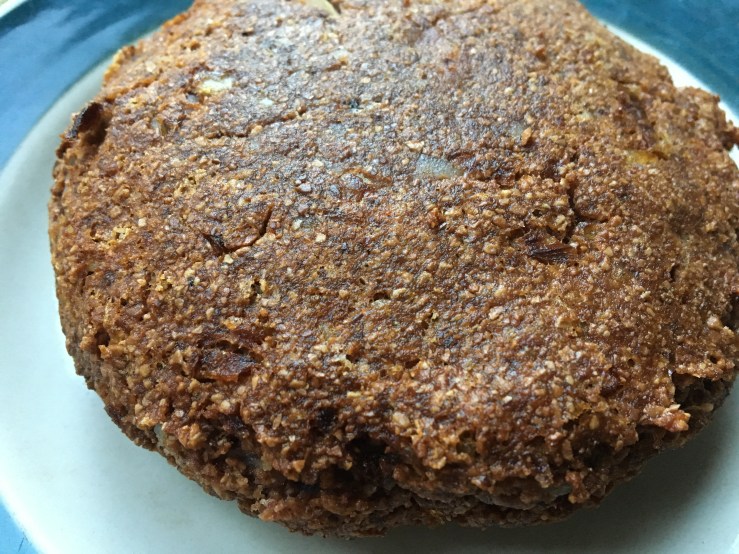
These acorn burgers use the latter, combined with milled or pureed potatoes to make a burger that is soft, somewhat fragile and has an amazing rich umami flavor. Unlike a lot of “veggie” burgers it doesn’t rely on pulses or TVP so it melts in your mouth, the way a properly cooked burger does. You don’t need particularly finely-ground flour for this, but you do need to process the potatoes so that they are fluffy and light, so a food mill, ricer or other form of fine-processing is required.
Combine a mixing bowl :
1 1/2 cups riced or milled cooked potatoes
1/2 cup acorn flour (preferably cold-leeched red oak flour)
1/3 cup grated onion
1 tbs prepared mustard (preferably high quality whole-grain or homemade)
salt to taste
freshly ground black pepper, optional
Mix the ingredients by hand and form into small patties. This recipe usually makes four burgers, about 3.5 oz each before frying. I usually fry the patties in a small amount of oil until brown and crispy on the outside, but you can also bake them at high heat.
The original recipe calls for the burgers to be stuffed with meat or sautéed mushrooms, and this can be done (I would recommend adding a few tablespoons of flour first if you go that route). However, I have found that simply adding sautéed mushrooms to the burger is much tastier. These are incredible simply served on a soft roll, with a dab of chile sauce or mayonnaise, some crispy lettuce and a few sliced onions. Really, any way you would prepare a traditional hamburger, falafel, or kebab meat suits them, from gyros to banh mi to Big Mac style double decker burgers. The flavor is deep but quite simple, so goes with almost any kind of topping, pickle or sauce.
Oyster Mushroom “Meatballs” with Acorn & Potato “Burgers” – two winter favorites
I love the humble Oyster Mushroom (Pleuratus ostreatus and others) : it appears in our area, in one incarnation or another, in almost every season. It’s dependability reduces it to a minor note in the logs of mushroom collectors – it can often assuage the hurt of not finding more esteemed mushrooms, such as morels in spring or maitake in fall, but few people seem to get excited about it. Some mushroom hunters seem to dismiss or even despise it, but I adore it. While it may not have the deep, rich flavor of a porcini it is a reliable workhorse mushroom and can stand in for more exotic or laudable fungi in spare seasons. More importantly for my needs, it serves admirably as the basis for rich stocks and essences, dries well, and appears in such quantity that it can be used to make mushroom ketchup or soy sauce or put up as mushroom pickles.
Beyond all these virtues, it has a quality that isn’t often celebrated even by its’ enthusiasts, at least not in Western food culture : oysters have a firm, dense texture. While they can be reduced down, or even rendered crisp or dry with enough cooking, the better option is to use them in recipes that celebrate this texture. This is just one such recipe, operating on the principle that finely chopped oysters resemble meat when cooked quickly, allowing their natural texture and moisture-retention to become a quality that assists in a dish with an excellent flavor and a remarkable similarity to meat-based polpette.
Conventionally-grown or home-grown oyster mushrooms can of course be substituted in this dish, you may also find it works with the conventional button mushroom of the supermarket. I recommend using the brown variety, often labelled “Cremini” as they have a bit more structure. If collecting wild oyster mushrooms or harvesting home-grown ones, you will want to collect them when they are firm and have attained at least most of their full growth, but before they become very dry, yellow, and fragile. You will also want to avoid collecting water-logged specimens, or if you do being sure to dry them and squeeze them of excess moisture first.
Combine in a mixing bowl :
5 oz oyster mushrooms, very finely chopped or pulsed in a food processor
3-4 oz onion, grated and squeezed free of liquid or pulsed in a food processor
1/2 cup breadcrumbs, preferably homemade
2 tbs mushroom powder or “bouillon of the woods” (see note)
1-2 eggs or equivalent egg substitute
salt to taste
dashes of mushroom soy, soy, maggi seasoning, or worchestershire sauce
herbs or dried herbs, if desired
freshly ground black pepper or american juniper, if desired
Mix the ingredients with your hands and shape into golf ball-sized “meatballs.” There should be about 12. This recipe can be doubled, tripled, etc. I have deliberately kept the size of the batch in this recipe small, so that you can experiment with the preparation of it and determine how best to process and cook the meatballs. I personally favor chopping the oyster mushrooms by hand, finding that the food processor renders far too uniform a product. If resemblance to meat is your goal with this recipe, however, that may be the route you want to go. I also recommend using both mushroom soy and a dash or two of maggi or worchestershire.
“Bouillon of the woods” is a simple preparation that I make as often as I find chicken of the woods fungi (Laetiporus spp.) that are just a bit too far gone to serve as is. A simple dried mushroom powder can be substituted – for which all you need to do is to grind dried mushrooms in a spice grinder. You may use wild mushrooms you have collected and dehydrated yourself, or dried mushrooms from the fancy or conventional supermarket (it’s actually a fantastic use for the dust or shake found in the bottom of bags of purchased dried mushrooms). For the preparation of my “bouillon of the woods,” I add a pinch or two of salt and a little crumbled wild bergamot, with perhaps another spice or two if desired, to a base of dried and ground chicken of the woods. It is meant to resemble the bouillon cubes found in supermarkets, but in a powder form and with much less salt. Another possible substitute if you don’t have any dried or powdered mushrooms is to use a purchased mushroom bouillon cube, such as the Telma brand from Israel. If a commercial product is used, you will likely want to reduce the amount of salt added.
Once assembled, these can be baked in hot oven, grilled or fried in vegetable oil or other fat. I prefer the latter two options, which tend to keep the insides moist while browning the outside nicely. You can also cook them in a sauce, but I would recommend rolling the shaped meatballs in either a little flour or extra breadcrumbs and then frying first before doing so. If you encounter difficulty in keeping the meatballs together, you may have had too much moisture in your mushrooms. I find that even conventionally-grown mushrooms require a little bit of drying before incorporating into polpette.
While these are quite tasty on their own, especially with a nice sauce for dipping as an appetizer (I love them with blackhaw ketchup), they can also be substituted for pork, beef, or veal meatballs in classic Italian, European, or Asian cuisine dishes. One of my personal favorite ways to serve them is in a dish inspired by Marcella Hazan’s recipe for winter pork meatballs smothered in savoy cabbage.
the below recipe made with kale and cabbage greens and romaine lettuce
After cooking the meatballs, I cover them to keep them warm and then in a sautée pan heat a little oil or butter. To this I add whatever greens I have available, whether wild or conventionally cultivated, adding the firmer or denser greens first and the more fragile ones later. Cauliflower greens, cabbage, kale, collards and the like are cooked a bit longer, and then blanched wild mustards, wintercress, dandelion greens or even raw watercress or lettuce are added with minced garlic once the firmer greens have softened. A minute or two later, the “meatballs” are then returned to the pan with a little white wine, and perhaps a splash of balsamic or blackhaw vinegar, and the whole is covered until heated all the way through.
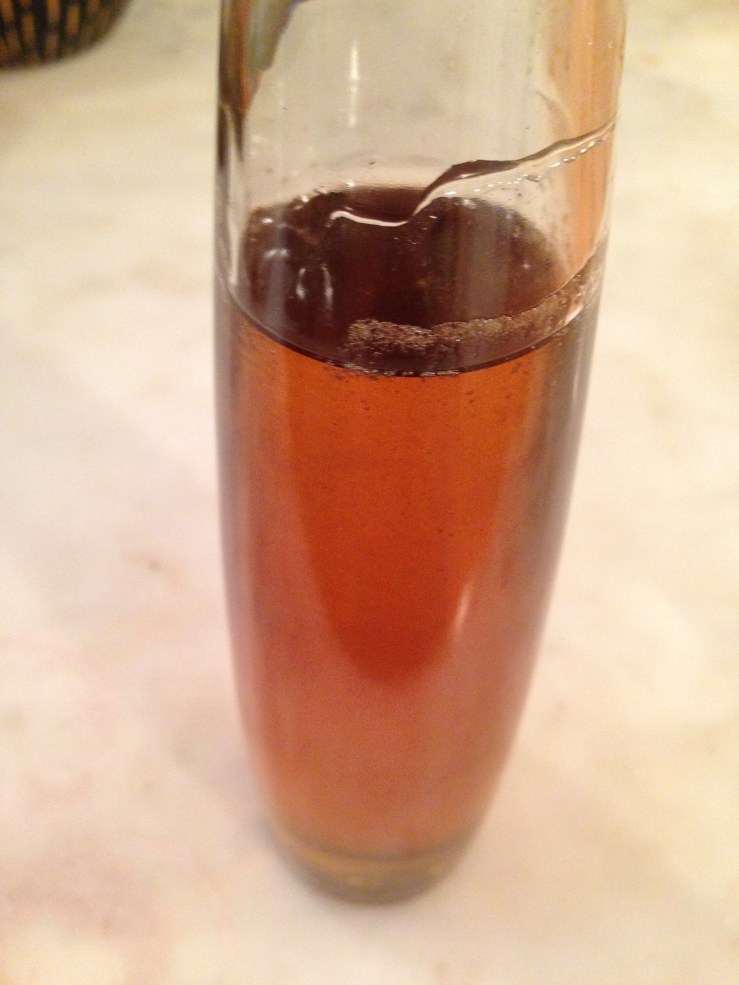
Hickory syrup is golden, smoky, beautiful and has legs for days…
The Hickory is a characteristically American tree, an irreplaceable member of the great deciduous forests of our continent. It is most known to those with only a casual interest in native trees as the genus which contains the Pecan (Carya illinoinensis), but there are a number of species of Hickory tree which are found, not commonly, but regularly in the woodlands of the Eastern half of the US. The mature stage of eastern hardwood forests is commonly referred to as the “oak-hickory forest,” underscoring the importance of this native tree.
Wild food gatherers will of course be familiar with the Hickory in the form of its edible nutmeats, gathered in the autumn as the nuts drop in their (usually) smooth green and segmented outer shells. While all hickory nuts are technically edible, not all species conform to what we would consider palatable. Within that window of taste, there are also variances from tree to tree. One of the most widely distributed and appreciated for both beauty and flavor is the Shagbark Hickory, Carya ovata.
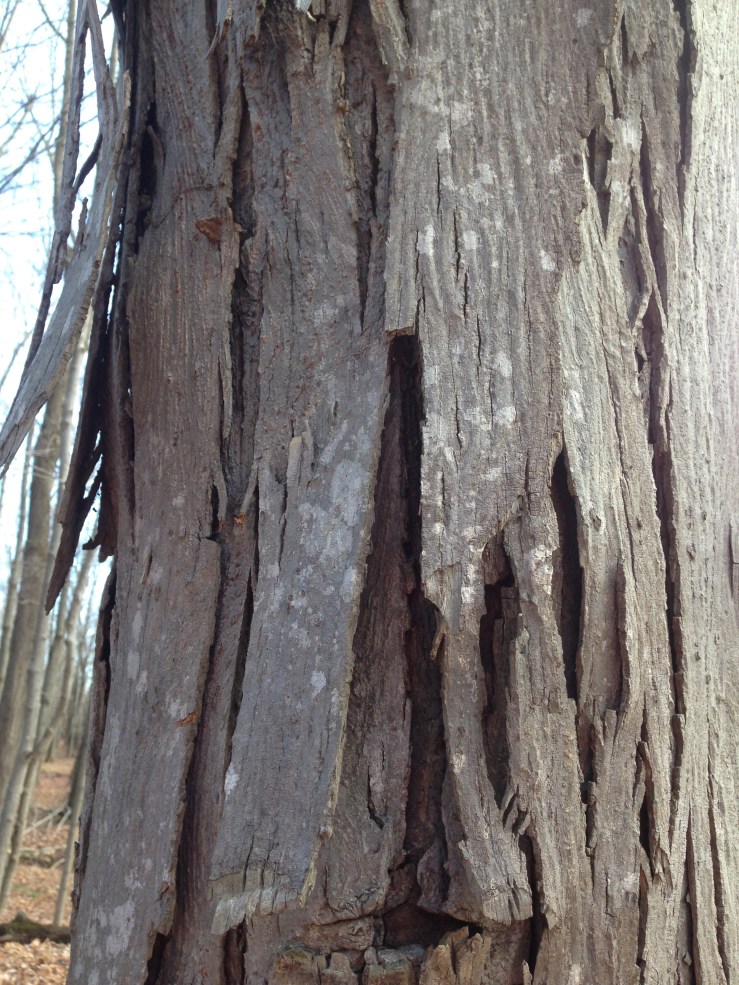
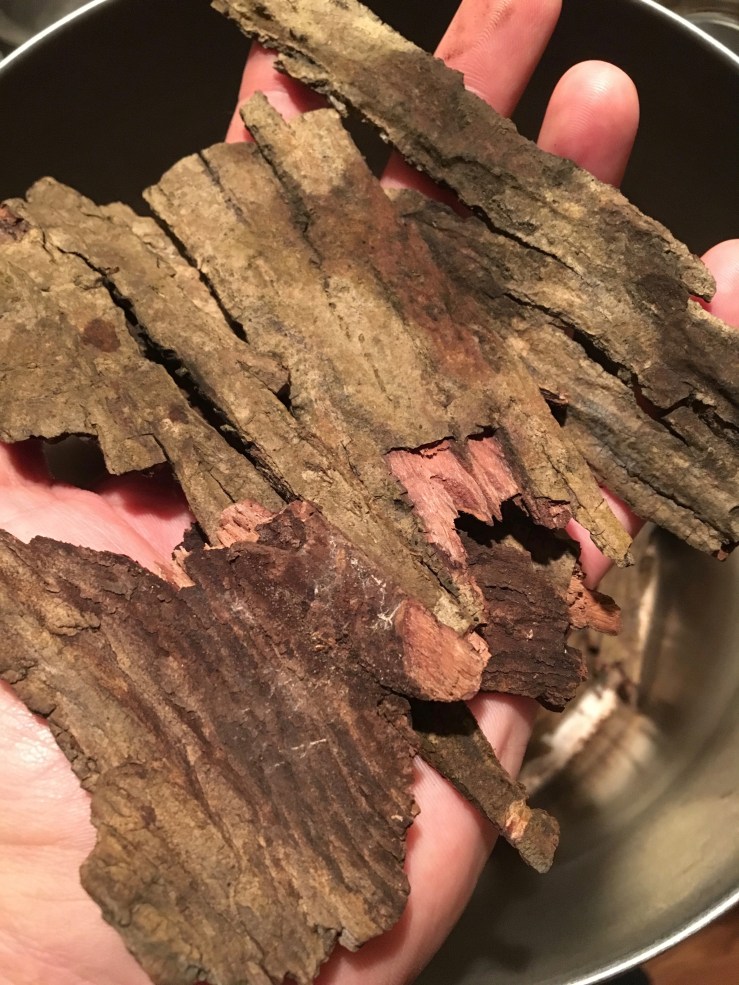
Mature shagbark hickory with its characteristic “shaggy” strips of exfoliated bark.
In addition to providing delicious nuts, the shagbark hickory has a bark which can be used to add flavor to smoked or grilled foods, in the fashion of other hardwoods such as apple, cherry and mesquite. Excitingly for our purposes here, it can also be used more directly, in the form of a tea which can be turned into a sugar syrup. This product of the hickory is often likened to maple syrup, but it is different in some fundamental ways. First of all, maple syrup is a natural product which is extracted from the natural sap of trees by a somewhat laborious process. Second of all, maple syrup tastes quite different from hickory syrup. So perhaps not such a great comparison. In terms of use, however, there is a certain similarity – hickory syrup can be substituted for maple syrup in both direct use and in recipes, with of course the knowledge that the flavor will be that of hickory, not maple.
I quite like maple syrup. I don’t wish to demean it in any way. But, to me, hickory syrup tastes better, and is far more interesting culinarily. Those who find maple syrup good but somewhat cloying may agree with me. Hickory syrup has an incomparable smoky, woodsy flavor that is a more complex than maple syrup, something which to my tastes makes it more useful for both sweet and savory recipes. Maple syrup is delicious, but hickory syrup is adventurous. The only flaw that I see is that the manufacture of hickory syrup relies on an outside product to sweeten it, in most cases cane sugar, which is of course an industrialized, tropical plant and carries with it a cost in terms of ecological impact. In its defense I will say that making hickory syrup is one of the best ways to use sugar, a product I generally avoid. And while the amount required is no more or less than one would use to make a simple syrup, the product is one that carries a huge amount of flavor in even small doses, especially when used in cooking and baked goods. Maple syrup is also quite expensive in terms of money if one buys it, and time if one makes it. Making hickory syrup is quick, simple and costs nothing more than the price of whatever amount of sugar one uses.
To produce hickory syrup, one first needs to locate a shagbark hickory tree. The shagbark is quite distinctive, having naturally exfoliated bark which hangs “shaggily” off the tree in large, easy to remove pieces (pictured above). This bark can be collected in any season, but I usually gather it in winter when other wild food options are reduced. First, I scout around the base of the trees I find to see if any strips have fallen to the ground. There is no direct harm done to the tree by removing its bark, but one does run the risk of exposing the inner bark to attack from insects (another reason to collect in winter). It also reduces the natural beauty of the tree, so I try always to take only a few strips from each tree and minimize the impact both ecologically and visually. It does not require a great quantity of bark to make a rich syrup, so I would recommend starting with just a few ounces and seeing how well you like it.
Toasted shagbark hickory bark, ready to be made into a syrup.
To prepare the syrup, you will want first to toast the bark in a low oven. This works on the same principle as dry-roasting spices before using them in a curry. The heat brings out flavors and aromas in the bark which would be less intense if the bark were not treated in this way. I have made hickory syrup without toasting it first, and it is perfectly serviceable, but not as deep in flavor. To toast the bark, place on a baking sheet in a low (under 200°) oven for 1-2 hours or a slightly hotter one (325°) for a half-hour or so. When I use the higher heat method I turn the bark halfway through. I’m not entirely sure that this is necessary, I am likely just being fussy.
Once the bark is toasted, allow it to cool and then prepare a tea from it. I generally use a ratio of 4-5 ounces of dry bark to 6 cups of water. Bring close to a boil, then cut the heat and allow the bark and water to simmer until the amount of water (now dark and flavorful) has been reduced to a third of its original amount. The amount of time this takes will vary greatly, so the best way to proceed is simply by measuring, reducing, and measuring again until one gets the liquid down to a third. I have prepared this tea with amounts as small as 2 oz of bark and as high as 1.5 lbs and found the general ratios to be effective in both small and large recipes. To make a practical, easily bottle-able amount the most usual proportion that I prepare is 8-10 oz. of bark to 12 cups of water, reduced down to 4 cups of tea. Avoid boiling, which will result in bitterness. It is perfectly acceptable (and perhaps beneficial) to allow the mixture to sit until cool, for several hours, or even overnight before straining the bark. When done, do not discard the strained bark. Instead, save it and use for additional flavor when grilling or smoking foods with hardwoods.
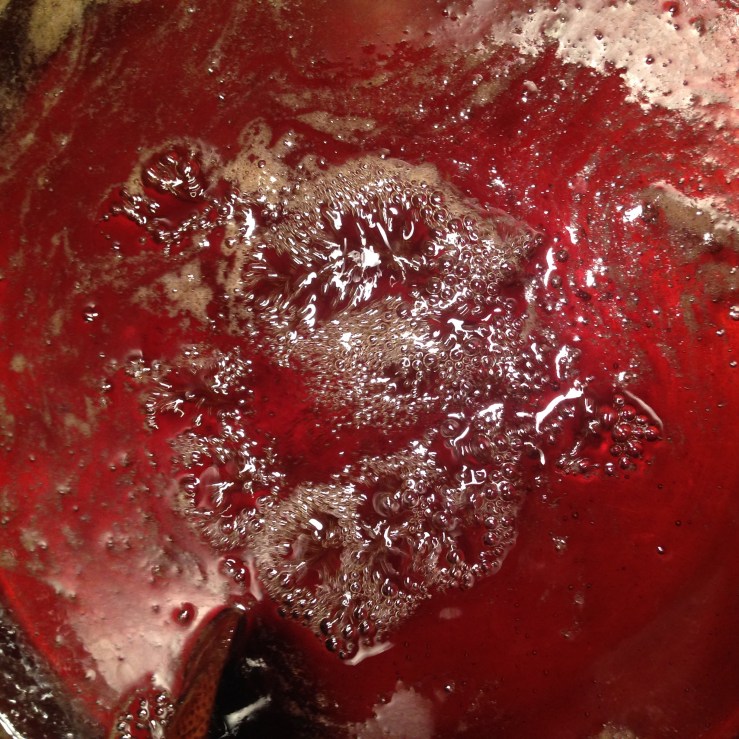
Hickory syrup being reduced. The color will vary from pale gold to reddish amber.
Next, you will want to add sugar. I prefer to use a proportion of 1 : 1 to make the basic hickory syrup, and then reduce it if I want a more concentrated and thick product (I usually refer to this as hickory glaze).
To make a hickory simple syrup, rather than a glaze, all one has to do is combine the sugar and tea over a low heat until the sugar dissolves. It is best to avoid stirring this mixture as it begins to get warm, as this will cause crystallization. This syrup will not be as thick as maple syrup, but is perfectly fine for most applications and is actually much better if you are going to add hickory syrup to drinks or use it in a recipe that will be cooked for any length of time.
Reducing the syrup to a glaze is more useful if it will be used to make salad dressings, added to dishes as a finishing touch, or poured over pancakes like maple syrup. I tend to reduce the syrup by anywhere from a quarter to a third, so going from a cup of hickory syrup to 2/3-3/4 cup of hickory glaze. I have found that reducing it much further results in a product that solidifies at room temperature. There is nothing much wrong with this thick syrup, it just requires heating in a water bath to become fluid again.
As to the uses of either hickory syrup or glaze, the only limit is one’s imagination. Of course it works wonderfully as a substitute for maple syrup, but don’t let your experimentation end there. Hickory syrup makes an amazing addition to various mixed drinks and cocktails, alcoholic or not, and is an ideal sweetener for lemonade or sumac-ade, adding its characteristic smoky flavor to the mix. It’s fantastic when substituted for honey or maple syrup in baked goods, makes a great base for vinaigrettes and yogurt dressings, and is inspiring drizzled on homemade ice creams and frozen yogurts. The combination of smokiness and sweetness means it pairs excellently with meats, especially pork sausages, bacon, and fried chicken. My favorite way to use it may be as a finishing touch to bitter greens, of which I eat quite a lot. And it almost goes without saying that it is an awesome pancake syrup.
It’s extraordinarily easy to identify shagbark hickory and make this syrup – there is an added bonus to collecting this bark in the winter, as well. Identifying hickory trees now means one can be there in the fall, when their nuts are available, for the shagbark hickory is one of the consummate wild foods, under appreciated in our area where they are so naturally abundant.
The Pine family (Pinaceae) is likely one of the first groups of plants that our ancestors recognized as broadly edible and safe. As human beings made their way further into colder climates, it would have become essential for life. Pines, spruces, firs, hemlocks, arbor vitae – all rated quite highly to pre-Industrial Europeans and Native Americans. Not simply for their timber, but their edible and medicinal uses as well. Above all else, the Pinaceae represented a crucial and easily available source of Vitamin C during the winter, sorely needed when diets were strictly seasonal.
While we now have a wide access to various supplements and pills to ensure that we don’t succumb to scurvy, some of the products made from the Pine family are still quite interesting from a perspective of taste and culinary curiosity. In particular, simple teas made from the needles of most conifers are an extremely healthy alternative to tannin-rich coffees and teas. In addition, those products are generally made quite far away. Your nearest Pine family member is probably in your front yard. They are available year-round, but I usually enjoy them most in the winter, both for their warming quality and their strong, seasonal flavor.
In the spring, the newly-emerging needles of conifers are soft, and can be eaten raw. Many wild food gatherers consider them a delicacy, and some only eat them raw, as a trailside nibble. The needles are gathered together at first in a tight cluster, usually referred to as a “tip,” as in “spruce tips.” While a tea can certainly be made from them, they are much finer used in prepared salts and sugars, infused in vinegars or alcohol, or added to other prepared dishes. As the seasons progress, these tips unfurl and harden off and become the years fresh set of needles. These are the needles you will collect for tea, and they are available any season of the year. Theoretically, one could use older growth just as well but the most recent sets will have more of the energy of the tree, and therefore more flavor.
All Pine family needle teas are prepared in the same fashion.Clip the freshest growth from the tree (see pictures and descriptions below for each genus), then wash the needles. Cover the needles with water (they should all be floating) and bring to just shy of a boil. If possible, do not allow the water to actually boil, as this will result in loss of Vitamin C. Instead, maintain a simmer and a careful eye on the pot, and allow it to simmer until you have enough depth of flavor. In practice, the amount of time this takes will vary radically, depending on volume involved, but the same procedure applies whether you’re making a cupful or a gallon. You will simply have to allow your taste to tell you when you have made a good tea. I prefer to simmer mine until its a little shy of what I’m looking for, then allow it to sit and steep until it cools, overnight if possible. I’m convinced this provides not only a fuller flavor than straining the needles immediately, but also a rounder and more complex one.
As to the flavor? Well, Pine family products are strong. Spruce in particular is a very robust flavor. Your appreciation of each of them may vary, and indeed you may despise them all. What they probably won’t remind you of is cleaning products, a common fear. Here are three that I particularly enjoy, two of which are made from native trees in my area, the other from a very popular import.
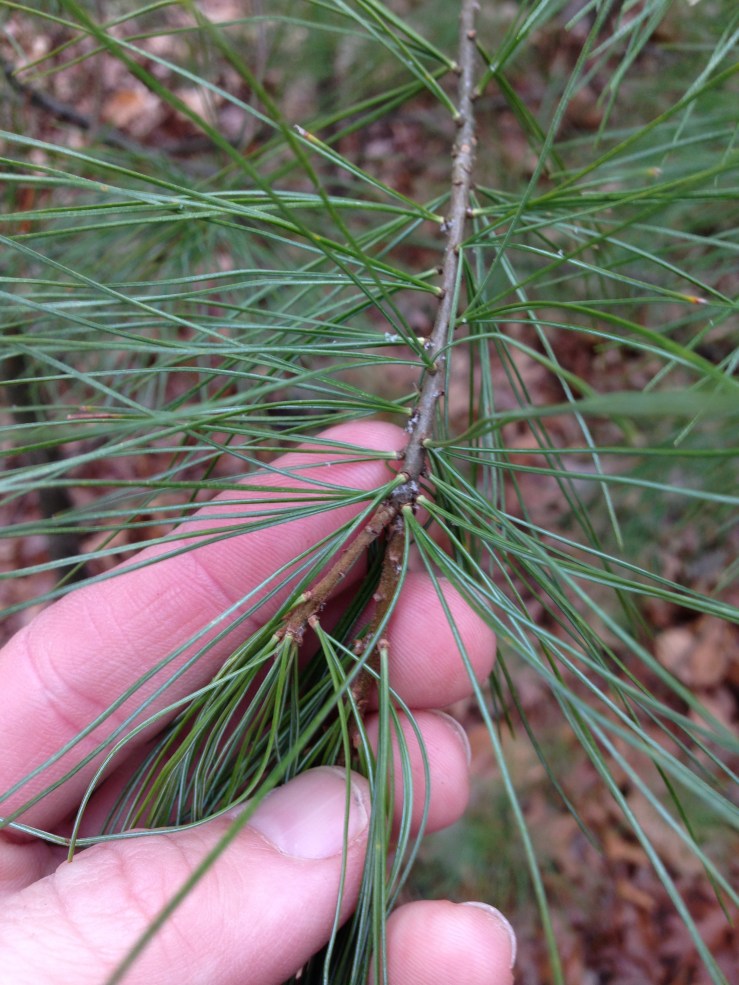
Eastern White Pine Tea (Pinus strobus)
Needles of the Eastern White Pine, with new growth visible at the bottom.
To collect pine needles, it’s best to look for a small colony of trees, and select from the younger members. I often select the needles from small trees growing along the perimeter of a hiking trail, since those trees are generally slated to be trimmed by the park workers anyway. Pull the freshest growth at the ends of the branches, concentrating on the lowest branches. You won’t need many pine needles to try a tea – a half-pound of them makes almost two gallons of tea.
This is my go-to Pine family tea, the most broadly palatable and subtle in flavor, and drinkable cold as well as warm. Some will likely disagree, indeed I have often read of people finding Pine products stronger than those of Spruce. Perhaps they use another Pine – I have always used Pinus strobus, since it is locally abundant. In addition, the needles are softer than other Pines, which always suggests to me greater palatability. In any case, tea from Eastern White Pine is citrusy, warming and somewhat mellow at first, but quickly following is a spicy and slightly resinous aftertaste. It’s “strong” in flavor to many, pleasant to some, and certainly beneficial to all. Pine tea has the most flexibility of these three in terms of being used for other applications, such as making a syrup, vinegar, or kombucha. It combines well with sugar, which tends to accentuate the citrusy taste, and makes a fine granita or sorbet.
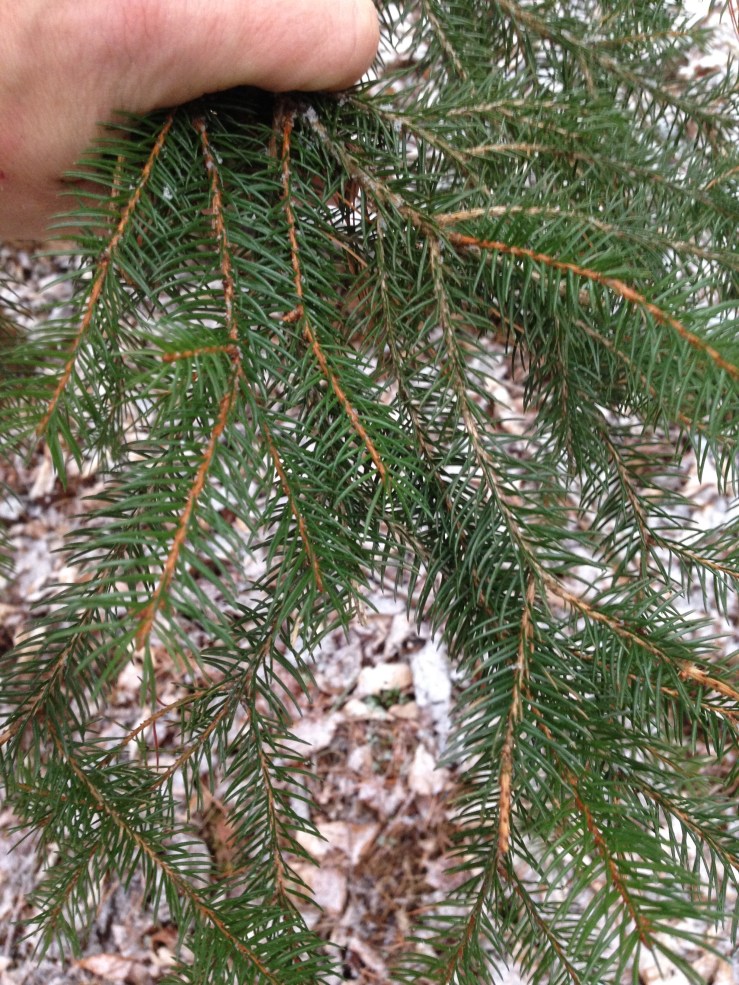
Norway Spruce Tea (Picea abies)
Freshest growth of Norway Spruce is generally more reddish, the older more grey.
To collect spruce needles, look for the most outward-branching lengths on the lower part of the tree and bend them backwards, then tear from the older growth. The newer growth on Norway Spruce will be more reddish and less grey.
This is not a native tree, but one widely planted in my area and in many other parts of the world. The original Christmas tree, the Norway produces strong, citrusy tips in the spring. They are large, plentiful and a natural choice for infusion or making spruce sugar. The tips are the true delicacy, but the tea is tasty as well. Strong, spicy and buttery, very rich in color and flavor. The woodsy, resiny taste is more pronounced in spruce tea than in pine, and unlike pine I don’t find it palatable cold. Spruce is the more natural partner to savory cooking applications, and has been used in sauces and glazes for meats, strong fish and hearty winter vegetables.
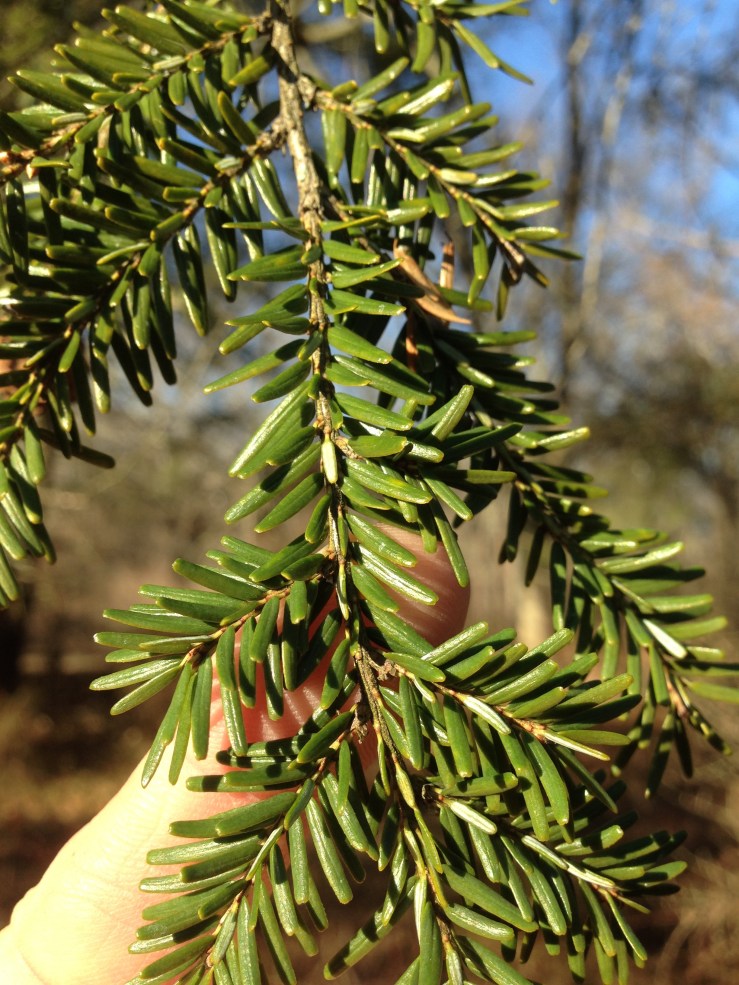
Eastern Hemlock Tea (Tsuga canadensis)
Fresh growth of Eastern Hemlock – the new growth will softer and less rigid.
To collect Hemlock needles, look for fresh growth at the tips of lower branches, from juvenile trees if possible. Bend them back to tear, in the same manner as spruce. If you tear downwards you will just end up with a shower of needles.
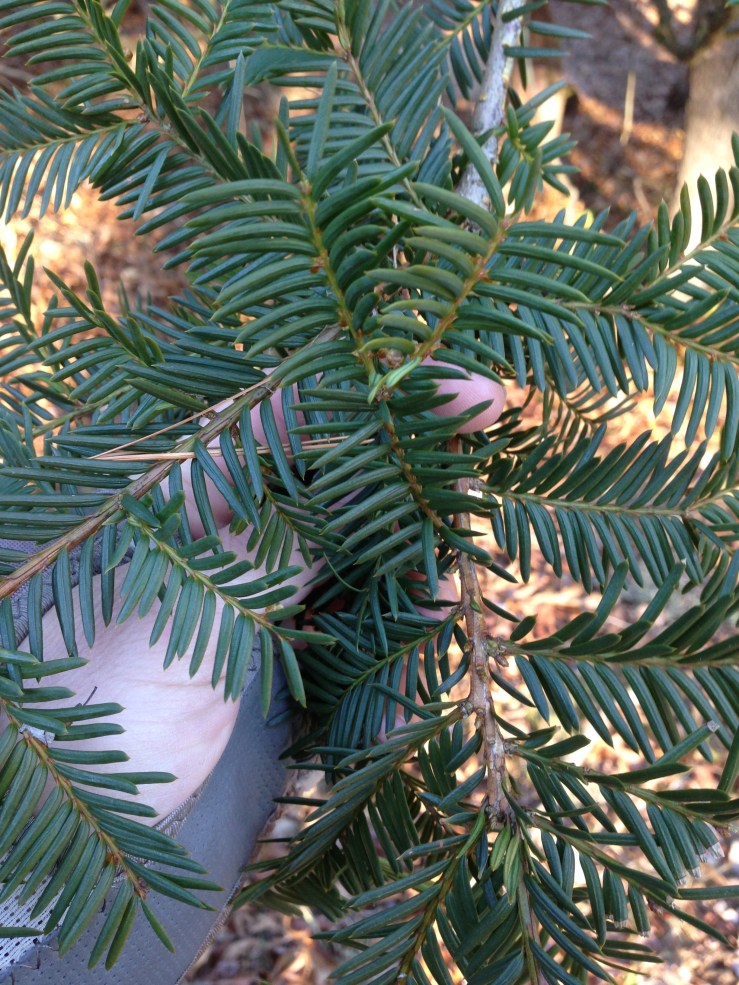
Eastern hemlock is the only one of the three species mentioned here that comes with not one, but several caveats. The first is not to confuse it with the highly poisonous, herbaceous plant in the carrot family that is also called Hemlock. Europeans who first encountered the tree in the Americas thought the freshly crushed needles smelled like that plant. The second is not to confuse it with the highly poisonous Yew, which it does somewhat look like (pictured below). In the Eastern US, yew is very rarely grown as a tree, but very often grown as a shrub. Hemlock has cones, usually always persistent, Yew does not. If you are in any doubt as to whether or not you have a Tsuga canadensis, then by all means do not collect it. The third (and thankfully, final) caveat is that T. canadensis in our area is often parasitized by the wooly adelgid, a kind of aphid. Adelgid damage on hemlocks is usually easy to spot – the trees generally look unhealthy and the branches will be dotted with white egg sacs, which are soft and look a bit like cotton or spit has gotten on the plant. While I’m not sure that one would be made sick by adelgid-infested hemlock tea, I wouldn’t care to find out.
This is a yew / don’t confuse the two!
In taste, the hemlock tea is somewhere inbetween spruce and pine, perhaps more complex and nuanced than either. As a consequence, I enjoy it the most as a pure drinking tea, usually with just a dab of sugar to mellow it out. It has the spicy and smoky notes of spruce, but isnt quite as bitter. I have yet to experiment much with hemlock tea beyond drinking it, but I can imagine it has other culinary uses. The tips in spring are the tastiest of all the Pine family I have tried, although they do tend to be on the small side.
All three of these teas are fine, healthy drinks, which can be made from a locally abundant resource and which have minimal impact on our environment. They represent a forgotten flavor, one which we have learned to dislike or distrust in our post-Industrial diet. Many other members of the Pine family can be used in the same fashion, and indeed all of these trees produce other useful and edible products, some of which we will hopefully discuss as winter turns into spring.
Note :
To make a greater quantity of any of these needle teas I usually follow a basic ratio of 1 oz of dry needles to 1 quart of water.
Wild food gathering in the temperate parts of the world inevitably means coping with the problem of winter. What do you do? Can you do anything?
Yes, you can. Actually, there’s quite a bit going on out there. You just can’t see it. The earth and (eventually, often) the snow conceal most of it from view. The rest is made invisible by our long conditioning that “nothing happens in the winter” when it comes to plants.
The foraging literature itself is faintly discouraging when it comes to winter. They don’t tell you not to do it, but the implication is that it isn’t particularly worthwhile. Emphasis tends to be placed since the Gibbons era on enjoying the fruits of the other seasons of harvest, sitting back in your chair with a seed catalog, shelling hickory nuts and sipping on persimmon wine. The winter section of every foraging book is like an afterthought, usually accompanied by a list of plants so desultory that it squashes the imagination, rather than firing it.
Yet, we all know this is precisely what is needed in the winter. A spark, a kick, especially after the holiday madness/joy (or forced madness/joy) is over and our bodies start to go into hibernation mode. The key is in viewing winter as not a dead time or a rest time but as just another time, simply another season. The activity of plants and trees and fungi around you hasn’t stopped, it’s just different. Which means we need to learn to look differently, to reassess our environment with fresh eyes.
More than just being a neglected time of year to gather wild foods, winter is also overlooked when it comes to studying wild plants and fungi. But if our knowledge of nature is to expand alongside our use of its’ resources, then winter is an ideal time to study as well as collect. Not only will our attention be drawn to interesting things we normally overlook, like mosses and bracket fungi, but towards the familiar things that have changed in aspect. And while the idea of looking at a bunch of dried twigs and seeds might not seem as romantic or appealing as trekking through a spring woods, in reality it can tell us quite a bit about the life cycle of these plants. Ultimately, knowledge of a wild food resource through all of its seasons, all of its changes, is really what we are after : comprehension of the patterns of its growth and how it deploys its energy in order to make our best use of it.
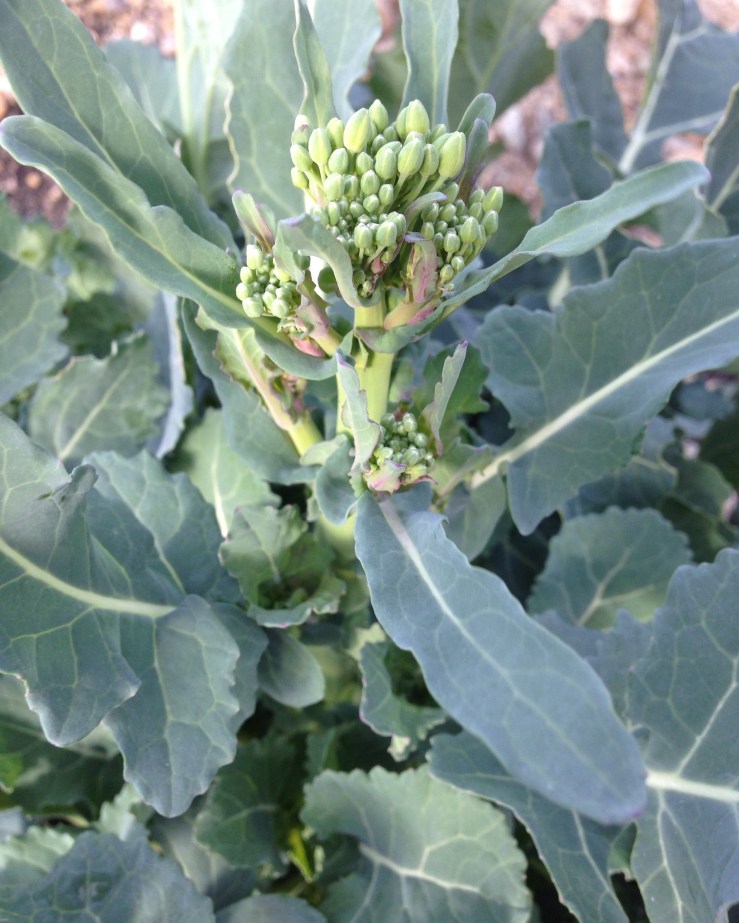
Uncharacteristic, but possible in a mild winter : Wild mustard forming its broccoli-like flowering head around Christmas time.
Over the course of the next few weeks I will be discussing in some detail how best to take advantage of the undervalued resource of wild food in winter, including profiles of specific plants and accompanying recipes. I hope to be able by springtime to have made my point that winter isn’t an “off” or “dead” season but simply the fourth season. Perhaps it’s a bit more humble than the others, but one well worth getting outside for, and certainly no occasion to hang up the basket. For now, as an antidote to all those discouraging lists of winter wild foods in foraging books here is one with just some of the things I have either gathered or noted as available in the past few winters :
Earlier this autumn, I wrote a few posts on Instagram (@mallorylodonnell) about processing acorns using the hot-water leaching method. I felt they were worth repeating on here, especially as a mild season has meant there are still viable acorns out there to collect. In any case, here is my hot-water method for leaching acorns of their tannins.
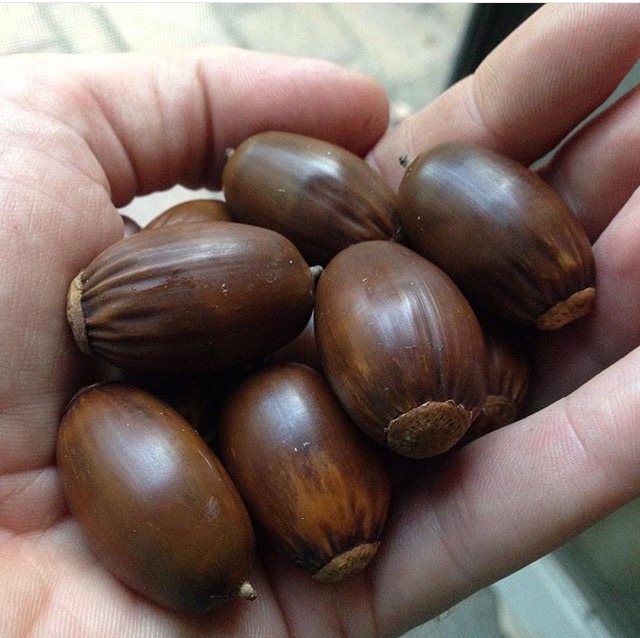
First, you must collect your acorns. Choose freshly-dropped acorns that look clean and feel firm and heavy for their size. Avoid acorns with one or more of the following characteristics : a white patina, green or yellow coloring, caps still attached, holes (caused by the exit, not entrance, of a grub), or excessive dark or bright coloration. Sprouted acorns are perfectly acceptable. While there is a definite variance in bitterness between white oak group and red oak group acorns, the most important concern for collecting acorns is their freshness and quality. Size matters too – bigger acorns mean less work. For to be sure, there is much work ahead. First wash the acorns, then cover them with water – those that float are to be discarded.
The second step is shelling the acorns. I am completely convinced I have the best method for doing this. I heat up a cast iron pan with one layer of acorns until they are fairly warm and starting to discolor (from brown to an orange-brown). Then I remove the pan from the heat and crush each acorn the way I would a fat clove of garlic, with the base of my hand pushing down on the base of my knife pushing down on an acorn. The acorn will split naturally in two, and if you’ve steamed it enough in the cast iron pan the dark brown film (like the skin of an almond) around the acorn will come off with the shell. Discard or cut the bad bits off of any imperfect acorns such as those with small holes or black spots. Acorns can also be shelled after being briefly blanched in boiling water or even without any preparation, but I find mine to be the easiest and fastest method.
The third step is leaching the acorns. This is necessary to remove tannins from the acorns for both health and flavor considerations. There are hot and cold methods, we will cover the hot one here.
Fill your largest pot with water and bring to a boil. At the same time bring a smaller pot to a boil. I usually fill the second pot about halfway. Add your viable, peeled acorns (steps 1 and 2) to the second pot and boil until the water becomes quite dark (Euell Gibbons says “tea-colored” but think black tea). Drain the acorns. Do not wash the acorns or clean them with cold water, but you can let them sit between rounds of boiling. Put the drained acorns in the now empty second pot and add some boiling water from the large first pot. I try not to use a huge quantity of water for each round of this, maybe twice as much as the amount of acorns. Repeat this process until the acorns are a chocolate brown and have no bitterness in their taste. I usually find this takes around 3-5 changes of water for sweeter acorns and usually a few more for the bitterest ones. Generally speaking white oaks and live oaks are sweeter, red and black oaks more bitter.
Once the acorns are leached, you may chop or use whole in any way you would use nuts. Bear in mind, they contain less oil than tree nuts, so they will be somewhat drier and crumblier. You can also grind them to a meal (or flour, if you will) and mix with other meals or flours in baked goods (remembering that acorn meal will have no gluten). The whole or chopped nuts or flour can also be roasted or sun dried, the acorns will turn nearly black if one does this.
I encourage everyone who is interested in wild food to prepare acorns. It is hard work but absolutely worth it. While preparing them you may wish to consider the many generations of humanity for whom this was a necessary activity – acorns were a staple food long before cultivated rice and wheat. But most of all they taste great and have a flavor which has no real substitute.
Perhaps the quintessential first dish to make using acorns, a simple acorn bread with a 50/50 ratio of acorn meal to white or wholemeal flour is a great way to really taste the flavor of the acorn meal. It doesn’t matter whether you use hot-leached or cold-leached acorn meal, just that it is very finely ground.
A light, moist, soft loaf with a very crispy almost cracker-y crust. If you’re feeling decadent you could turn it into a bread pudding, but I enjoy it as is, especially hot from the oven with just a dab of salted butter or jam made from wild berries. Hickory syrup and a touch of molasses really make the difference, both of those flavors combining well with the earthiness of acorns.
My method for hot-leaching acorns to obtain acorn meal is here.
Whisk together :
2 cups acorn meal
2 cups bread flour
4 tsp baking soda
1/2 tsp salt
Whisk together :
1 egg or egg substitute
1/2 cup milk, whey or rice milk
1 tbs molasses
1/4 cup hickory or maple syrup
3 tbs olive oil
Add the liquid ingredients to the dry ingredients, stir to combine, and pour into a greased loaf pan or cast iron skillet. Place the pan in a 400° oven for 30 minutes or until a toothpick inserted into the center of the bread comes out clean.