My apologies for the pun, but this is seriously the best way to make a Pine Needle tea, or for that matter a tea from any member of the Pine Family. After many long and frustratingly-erratic results making a pine tea on the stovetop, I began to use my slow-cooker to optimize results. This recipe relies on a larger quantity of needles that usually called for in pine tea recipes, which means you needn’t spend a lot of time cutting them into tiny pieces.
I STRONGLY recommend you use a crock pot or slow-cooker for this, if you have one. It more or less eliminates the chance of human error and more importantly it ensures you don’t lose an ounce of Vitamin C from the preparation. The flavor is deep, strong, and naturally sweet and can be not only drunk as a tea but used in secondary ferments of kombucha, turned into a syrup or sorbetto, or made into a brine in which to ferment vegetables. Since first using the slow-cooker for pine needle tea I now use it exclusively.
Place in slow cooker or stock pot :
200 g or 6 oz pine needles or fir or spruce or hemlock (Tsuga) branches (a small basketful)
3 L or 12 cups water
Set heat to High if using slow cooker. Bring to just short of a boil if using a stock pot. DO NOT BOIL.
Cover and maintain over as high a heat as possible without boiling for 4-8 hours in a slow cooker, 1-2 hours on stovetop. Shut off the slow cooker or remove the pot from the heat and allow the needles to rest in the tea for several hours or overnight. Strain the tea through a cheesecloth.
You may notice that if the mixture has rested overnight there is some small level of fermentation activity. This is ideal if adding the mixture to a kombucha secondary ferment, using as a pickling medium, or turning it into wine. Simply refrigerate the tea in order to keep fermentation from proceeding any further.
To make a pickling brine from this tea, simply add salt in a ratio of 50 g / Liter of finished tea, bring the mixture to a low heat and stir the salt until dissolved. To make a syrup, do the same but using a ratio of either 1:1 or 1/2:1 sugar to tea.
Curry powder always seemed to me a shabby thing to buy, it being so much more interesting to work with the whole spices themselves. I was spurred on by one of the first cookbooks I ever bought, a collection of recipes and information about spices published to sell the goods of a local spice importer. By understanding the spices individually, I was able to experiment with them culinarily, adding more or less to a mix depending on what I intended to do with them. Cardamom and cloves, for instance, could be added if I was using a mix to spice tea or desserts with. I would add more dried curry leaves and turmeric when making a mix for fish.
When I began to seriously incorporate more of the native and invasive wild spices of the world of wild food, it wasn’t a great stretch of the imagination to start to envision a masala or curry mix made entirely of foraged aromatics. And while an excellent entirely wild curry mix can be made, I usually find that I miss the cumin acutely. For day to day use and especially when replacing imported curry powder in traditional recipes, I have settled on a curry mix that is “nearly wild,” relying only mainly on foraged ingredients. It is also quite flexible, and may be adapted, altered or expanded by anyone who uses it, with many replacements or omissions possible. I believe it can be used in most temperate climates without too much trouble, assuming the availability of traditional imported spices to replace what cannot be foraged.
I have omitted any turmeric or substitute for turmeric in this recipe. To many, the taste and color of curries cannot be separated from that spice. Now that organic fresh turmeric is much more widely available, I use it in these curries, when it can be added at the time of cooking. You may wish to add that or the powdered form to affect a more traditional coloration. I sometimes add annatto seed instead for “local color,” but of course the color is a different one. Below is the recipe, see notes after the recipe for information on substitutions. I have deliberately split the list of ingredients into three groups.
Combine :
1 ) essential bases
1 tbs. black mustard seed (wild or domestic)
1 tbs. cumin seed
1 tbs. wild parsnip or pushki or coriander seed
1-2 tsp wild carrot seed (optional, omit if using coriander seed)
2) optional aromatics
2-3 northern bayberry leaves or 1-2 bay leaves or 8 curry (kari) leaves
1-2 magnolia buds, dried or pinches of magnolia leaf or 1 clove
1 tsp american juniper berries or 1/4 tsp european juniper
1-3 eastern hemlock cones
3) “hot” or piquant aromatics
1-2 tsp prickly ash berry or sichuan peppercorn
1-3 tsp waterpepper seeds (or 1/2-1 tsp black peppercorns)
1-2 tsp chile flakes or 1-3 small dried hot chiles
Combine all the above in a heavy pan and heat over low to medium heat, tossing every thirty seconds or so, until the spices are toasted and fragrant. You can also store the mix, combined and use as whole spices in pickles or broths, or toast and grind it to order, which will give the best flavor. My only advice would be to use the whole recipe when grinding or using to infuse, as the many different-sized and shaped ingredients tend to separate themselves in the jar.
The trinity of mustard-cumin-wild parsnip is essential to this mix, nearly everything else can be omitted or varied. If using domesticated mustard seed, the variety to use is the brown or black mustard seeds preferred in Indian cuisine. Wild mustard genera which produce seeds that can be used for this include Brassica, Lepidium, Barbarea, Thlaspi, etc. Wild parsnip or pushki (Heracleum maximum, other edible Heracleum species can be substituted) seed, along with wild carrot seed all bear some resemblance to family member coriander. Pushki and wild parsnip have a drier, earthier flavor to them while wild carrot is spicier and lightly citrus-y. Always remember to avoid wild carrot seed if pregnant or desiring to become so–while I doubt that the small amount involved would have much effect unless consumed in massive quantities, wild carrot seed is traditionally considered an abortifacient.
The second group of aromatics are all wild but any can be omitted or substituted with the imported spices listed, with the exception of hemlock cones, which really have no parallel. If there is one wild spice in this group that I would strongly recommend investigating (and not replacing with allspice, which is a paltry substitute), it is spicebush. Native to the eastern US, it is a native understory tree which produces a green berry in summer that matures to a deep red in autumn. It is resinous and pungent and can be used ripe or unripe, fresh or dried. It has become inseparable from various curry mixes and is the most distinctive background player in this recipe, in my opinion.
Heat can be regulated by adjusting the last group of ingredients, which is in part why I have left a range for those items. I would describe this mix as moderately spicy, but not extremely so, even if using the larger numbers and including all three hot items. For a heavier spice, simply add more of whichever piquant aromatic you prefer.
This is an eminently simple preparation, adapted from a traditional German recipe. My eternal thanks to Steffi / Sycamore Spirits for translating this and many other recipes for me from a cookbook brought to the states with her from Germany. Though acorns are considered largely a famine food in most of Europe, they aren’t really thought of as food at all here in the US, even though they formed a substantial part of the diet of many early settlers.
For me, there is likely no more significant wild food in my diet than acorns. Not perhaps, in terms of quantity – but in terms of importance. I look forward with great eagerness to harvesting acorns in the fall, for while time-consuming it is a supremely relaxing activity. Processing acorns, too may be an exhaustive activity but it pleases me to no end, and there are few wild food products I treat with more reverence than a jar of pickled acorns or a tub of acorn flour.
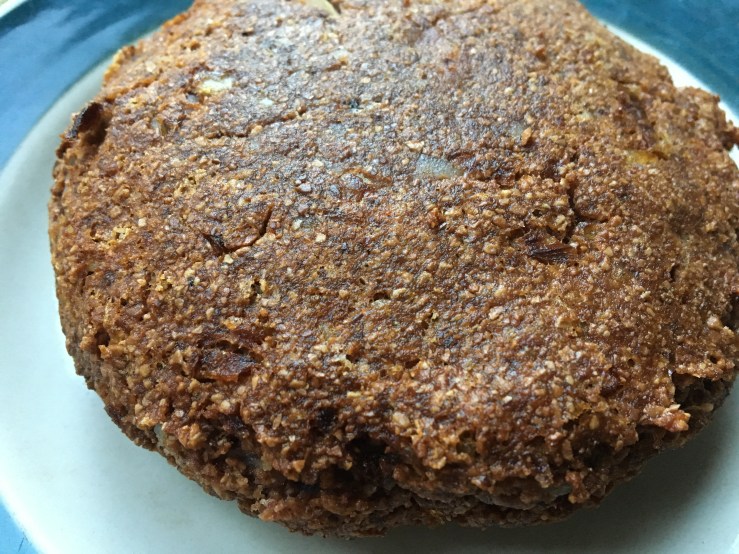
These acorn burgers use the latter, combined with milled or pureed potatoes to make a burger that is soft, somewhat fragile and has an amazing rich umami flavor. Unlike a lot of “veggie” burgers it doesn’t rely on pulses or TVP so it melts in your mouth, the way a properly cooked burger does. You don’t need particularly finely-ground flour for this, but you do need to process the potatoes so that they are fluffy and light, so a food mill, ricer or other form of fine-processing is required.
Combine a mixing bowl :
1 1/2 cups riced or milled cooked potatoes
1/2 cup acorn flour (preferably cold-leeched red oak flour)
1/3 cup grated onion
1 tbs prepared mustard (preferably high quality whole-grain or homemade)
salt to taste
freshly ground black pepper, optional
Mix the ingredients by hand and form into small patties. This recipe usually makes four burgers, about 3.5 oz each before frying. I usually fry the patties in a small amount of oil until brown and crispy on the outside, but you can also bake them at high heat.
The original recipe calls for the burgers to be stuffed with meat or sautéed mushrooms, and this can be done (I would recommend adding a few tablespoons of flour first if you go that route). However, I have found that simply adding sautéed mushrooms to the burger is much tastier. These are incredible simply served on a soft roll, with a dab of chile sauce or mayonnaise, some crispy lettuce and a few sliced onions. Really, any way you would prepare a traditional hamburger, falafel, or kebab meat suits them, from gyros to banh mi to Big Mac style double decker burgers. The flavor is deep but quite simple, so goes with almost any kind of topping, pickle or sauce.
Oyster Mushroom “Meatballs” with Acorn & Potato “Burgers” – two winter favorites
I love the humble Oyster Mushroom (Pleuratus ostreatus and others) : it appears in our area, in one incarnation or another, in almost every season. It’s dependability reduces it to a minor note in the logs of mushroom collectors – it can often assuage the hurt of not finding more esteemed mushrooms, such as morels in spring or maitake in fall, but few people seem to get excited about it. Some mushroom hunters seem to dismiss or even despise it, but I adore it. While it may not have the deep, rich flavor of a porcini it is a reliable workhorse mushroom and can stand in for more exotic or laudable fungi in spare seasons. More importantly for my needs, it serves admirably as the basis for rich stocks and essences, dries well, and appears in such quantity that it can be used to make mushroom ketchup or soy sauce or put up as mushroom pickles.
Beyond all these virtues, it has a quality that isn’t often celebrated even by its’ enthusiasts, at least not in Western food culture : oysters have a firm, dense texture. While they can be reduced down, or even rendered crisp or dry with enough cooking, the better option is to use them in recipes that celebrate this texture. This is just one such recipe, operating on the principle that finely chopped oysters resemble meat when cooked quickly, allowing their natural texture and moisture-retention to become a quality that assists in a dish with an excellent flavor and a remarkable similarity to meat-based polpette.
Conventionally-grown or home-grown oyster mushrooms can of course be substituted in this dish, you may also find it works with the conventional button mushroom of the supermarket. I recommend using the brown variety, often labelled “Cremini” as they have a bit more structure. If collecting wild oyster mushrooms or harvesting home-grown ones, you will want to collect them when they are firm and have attained at least most of their full growth, but before they become very dry, yellow, and fragile. You will also want to avoid collecting water-logged specimens, or if you do being sure to dry them and squeeze them of excess moisture first.
Combine in a mixing bowl :
5 oz oyster mushrooms, very finely chopped or pulsed in a food processor
3-4 oz onion, grated and squeezed free of liquid or pulsed in a food processor
1/2 cup breadcrumbs, preferably homemade
2 tbs mushroom powder or “bouillon of the woods” (see note)
1-2 eggs or equivalent egg substitute
salt to taste
dashes of mushroom soy, soy, maggi seasoning, or worchestershire sauce
herbs or dried herbs, if desired
freshly ground black pepper or american juniper, if desired
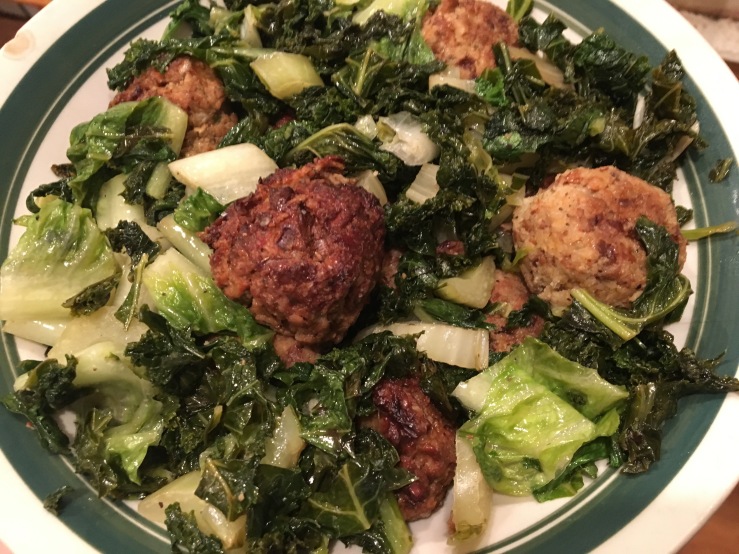
Mix the ingredients with your hands and shape into golf ball-sized “meatballs.” There should be about 12. This recipe can be doubled, tripled, etc. I have deliberately kept the size of the batch in this recipe small, so that you can experiment with the preparation of it and determine how best to process and cook the meatballs. I personally favor chopping the oyster mushrooms by hand, finding that the food processor renders far too uniform a product. If resemblance to meat is your goal with this recipe, however, that may be the route you want to go. I also recommend using both mushroom soy and a dash or two of maggi or worchestershire.
“Bouillon of the woods” is a simple preparation that I make as often as I find chicken of the woods fungi (Laetiporus spp.) that are just a bit too far gone to serve as is. A simple dried mushroom powder can be substituted – for which all you need to do is to grind dried mushrooms in a spice grinder. You may use wild mushrooms you have collected and dehydrated yourself, or dried mushrooms from the fancy or conventional supermarket (it’s actually a fantastic use for the dust or shake found in the bottom of bags of purchased dried mushrooms). For the preparation of my “bouillon of the woods,” I add a pinch or two of salt and a little crumbled wild bergamot, with perhaps another spice or two if desired, to a base of dried and ground chicken of the woods. It is meant to resemble the bouillon cubes found in supermarkets, but in a powder form and with much less salt. Another possible substitute if you don’t have any dried or powdered mushrooms is to use a purchased mushroom bouillon cube, such as the Telma brand from Israel. If a commercial product is used, you will likely want to reduce the amount of salt added.
Once assembled, these can be baked in hot oven, grilled or fried in vegetable oil or other fat. I prefer the latter two options, which tend to keep the insides moist while browning the outside nicely. You can also cook them in a sauce, but I would recommend rolling the shaped meatballs in either a little flour or extra breadcrumbs and then frying first before doing so. If you encounter difficulty in keeping the meatballs together, you may have had too much moisture in your mushrooms. I find that even conventionally-grown mushrooms require a little bit of drying before incorporating into polpette.
While these are quite tasty on their own, especially with a nice sauce for dipping as an appetizer (I love them with blackhaw ketchup), they can also be substituted for pork, beef, or veal meatballs in classic Italian, European, or Asian cuisine dishes. One of my personal favorite ways to serve them is in a dish inspired by Marcella Hazan’s recipe for winter pork meatballs smothered in savoy cabbage.
the below recipe made with kale and cabbage greens and romaine lettuce
After cooking the meatballs, I cover them to keep them warm and then in a sautée pan heat a little oil or butter. To this I add whatever greens I have available, whether wild or conventionally cultivated, adding the firmer or denser greens first and the more fragile ones later. Cauliflower greens, cabbage, kale, collards and the like are cooked a bit longer, and then blanched wild mustards, wintercress, dandelion greens or even raw watercress or lettuce are added with minced garlic once the firmer greens have softened. A minute or two later, the “meatballs” are then returned to the pan with a little white wine, and perhaps a splash of balsamic or blackhaw vinegar, and the whole is covered until heated all the way through.