Salt-Cured Cherry (and Other) Blossoms

blossoms1.jpg
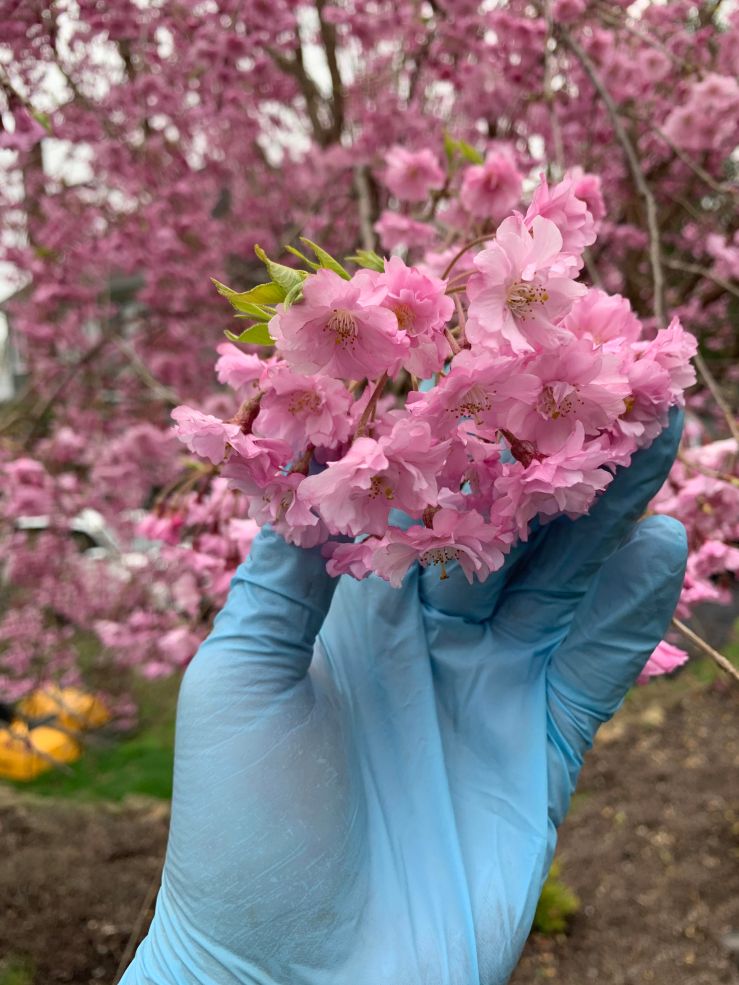
Blossoms in the time of corona.

The fleeting time of the cherry blossom is as brief as it is beautiful. To wit, tragically. 

Thankfully, their incredible aroma and flavor can be preserved in various ways. Less so, their visual beauty. Photographs and memories are about the best we can do. But culinarily, vinegar, honey and salt all play their part. Today we will focus on the salt, based on a traditional Japanese technique.

Salt-curing cherry blossoms relies on using a method involving two different processes–saturating the blossoms in salt for several days, then rinsing and soaking in vinegar. After this point, the flowers can be dried and stored indefinitely. Some of them will improve with age, while some of them will degrade over time. Every species of cherry and indeed every tree is somewhat unique and different. But, it is not just cherry blossoms that can be preserved in this way. So many flowers can be salt-cured that it seems almost ridiculous to list them. For the most part, I have experimented with tree flowers because they tend to be a bit more durable and they are quite easy to collect (Imagine collecting 5 cups of ground ivy flowers).

I have salt-cured with success :

Various Cherry Blossoms

Apple Blossom and Leaf

Peach

Ornamental Plum

Ornamental Quince

Magnolia (x soulangeana, stellata, etc)

Wisteria

Black Locust

Redbud

For the last three (and, presumably, any member of the Fabaceae) I recommend aging in the last stage. These flowers tasted of very little for their first six months or more in a jar. As the time progressed, their flavor suddenly re-emerged, like a lover hidden behind a fan.
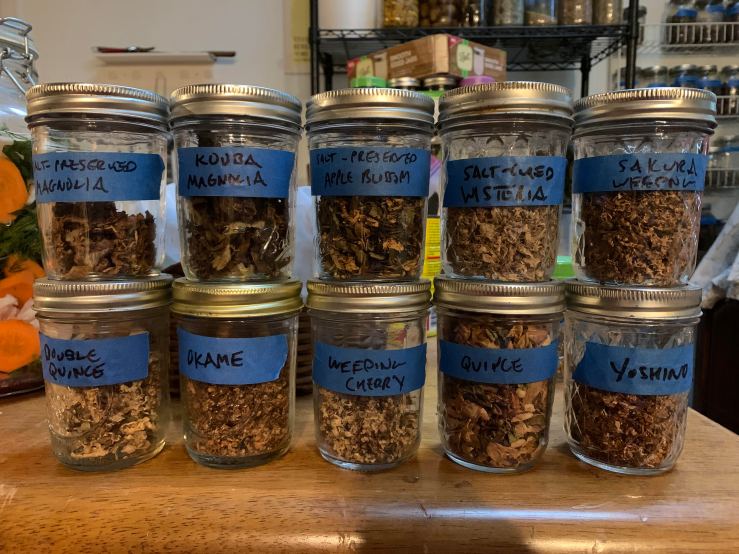
blossoms.jpg
A variety of preserved blossoms.

Any of the flowers listed above (and many more I am sure) can be preserved using this method. Every type of cherry blossom is different, so expect variance in the flavors produced. In addition, I recommend collecting the flowers at the peak of their season, once they have emerged and been on the tree long enough for aroma and flavor to accumulate, but before they begin to fade in pungency. It is also best to collect the flowers on a clear, dry day and not immediately after rainfall. You want them to be at their maximum potency, otherwise what is the point of preserving them? The flavors of these flowers are fleeting, so only process at their peak!

As far as the other ingredients, I use finely ground Himalayan pink salt (this is a rock salt, gathered in the highlands, and will be free of micro-plastics, which can no longer be said of sea salt) and a relatively neutral vinegar like rice, cider or Korean brewing vinegar. 

Process

• For every 1 cup of loosely-packed blossoms, use 3 tbs of finely ground salt.

• Combine blossoms and salt, applying light pressure to work the salt into the flowers.

• Place in a non-reactive (glass or plastic or ceramic) container, cover and apply light pressure.

• Uncover and toss/stir the blooms once a day, then cover and weigh again.

• After three days uncover and rinse the blossoms of as much salt as possible.

• Air dry the blossoms or dehydrate at a low temperature (80° F) for a few hours.

• Place in a clean glass jar and cover with vinegar. I generally use at least 1/2 cup vinegar : 1 cup flowers.

• Allow to sit in the vinegar for at least one-two weeks.

• Remove the flowers from the brine and dehydrate at a higher temperature (100° +) until fully dry.

• Store flowers in a clean glass jar at room temperature.

• Reserve brine for use in dressings, marinades and pickles.
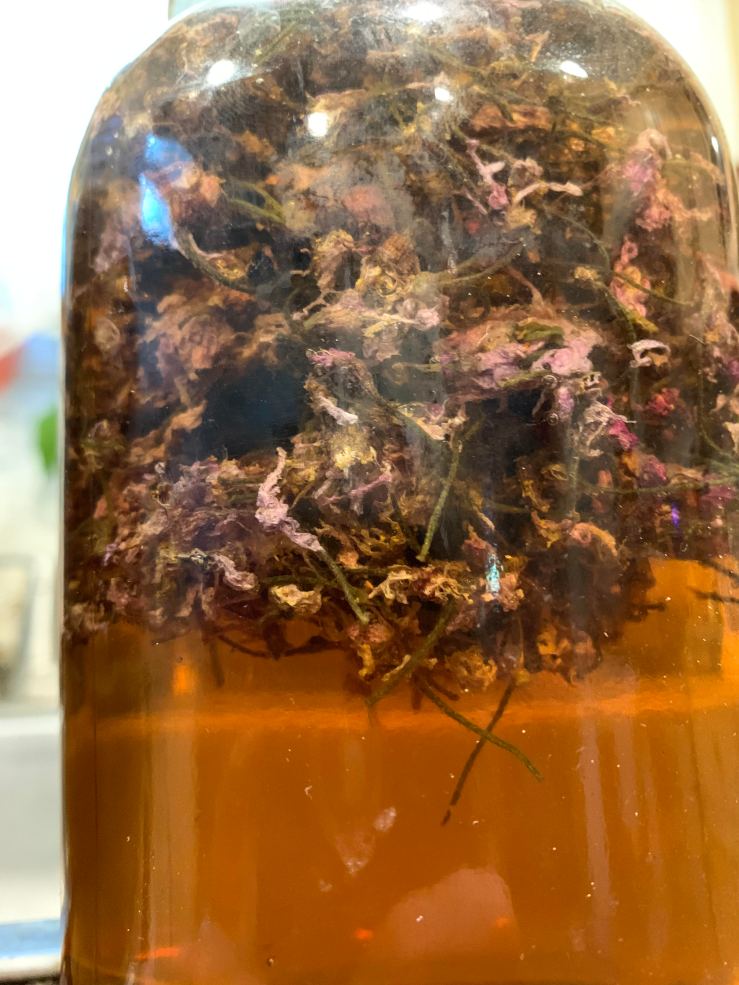
blossoms3.jpg
Weeping cherry blossoms soaking in cider vinegar.

The flowers and the brine can both be used for many different dishes, the only limit is your culinary creativity. The flowers are intriguing as a garnish, an ingredient in spice and salt mixes, as a unique tea (the traditional use), and even in a sweet and salty ice cream! The brine is a perfect base for a marinade or a dressing, and is essentially a pre-made and flavored pickling medium. Always taste before using, as each flower will create a different set of flavors. As long as the flower is safe for eating, I see no reason why this wouldn’t work with a great many blossoms.
Wild & Conventional Herbs Preserved in Salt

IMG_0048.jpg
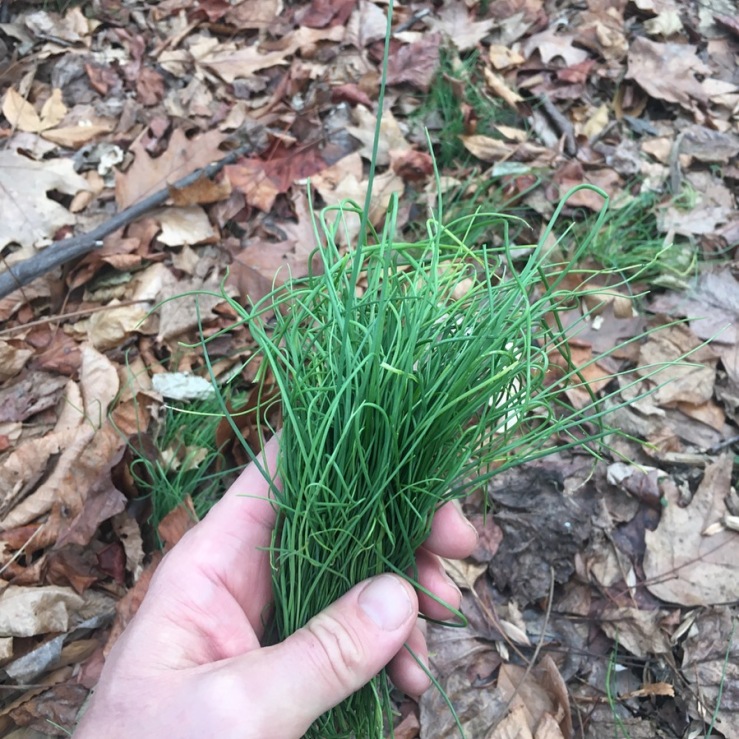
Picking lovely field garlic in mid-winter to add to herbs preserved in salt.

The harvest and use of herbs and greens is a year-round process in my kitchen. Generally, I use wild herbs and seasonings or those grown in my garden, but of course many fine farms and friends grow herbs as well, so there is plenty of bounty to preserve, even in the off-season. I am always looking to explore ways to keep the ingredients seasonal, but extend their life by various preservation methods, so that I can have my cilantro in winter and not feel too guilty about it. One of the best ways to do this is to employ a bit of salt. Indeed, quite a bit of salt. By chopping fresh herbs (augmented if you desire with a little vegetable material such as leek, celery or carrot) and combining with salt you can keep some of the bright intensity of fresh aromatics from decaying.

Our culinary herbs, especially those that dominate the cooking of the Mediterranean basin, are nearly all drawn from two plant families. The majority of plants that most cooks from that tradition (and indeed, many others) will recognize as herbs are either a member of the Lamiaceae (Mint Family) or Apiaceae (Carrot Family). The first includes the obvious “true” mints such as spearmint and peppermint, but also widely-used seasonings such as thyme, oregano, rosemary, basil, shiso, savory, lavender, etc. The second contains cilantro and parsely, alongside dill, fennel, caraway, chervil, anise, angelica, and many more. In addition to aromatic herbs, the carrot family has a number of vegetables (celery, carrot, parsnip, fennel) and plants whose seeds are used as spices (cumin, coriander, ajwain, caraway, alexanders). It might come as no surprise that a number of the wild plants we can use as herbs also come from these same families.

There are a number of methods available to preserve the flavor of fresh herbs when they are in season. The one most people will be familiar with is drying, I have found this to be a particularly excellent method to use when dealing with the mint family. Indeed, many of the mints which we collect as wild plants or grow have a marked flavor improvement when dried. Oregano, for instance, or the plant Monarda fistulosa (Wild Bergamot) are herbs I don’t use great amounts of fresh, finding them a bit too intense for most things. However, when dried they are huge staples of my kitchen year-round. But while dehydration is effective for the mints, it tends to make the more subtle flavors of the carrot family disappear. Anyone who has used dried parsley will discover pretty quickly that it tastes precisely like nothing. Again, this extends to the wild members of the family–my attempts to dry pushki (Heracleum maximum) leaves without treating them first has invariably resulted in a tasteless product. Drying of aromatic members of the genus Allium (Onions, Chives, Leeks, etc) is also sometimes fraught with difficulty. Leek greens hold up fairly well, and sometimes chives, but the wild members tend to lose their more ephemeral flavors.

My preferred methods to preserve both Alliums and Apiaceae are to use brine or vinegar, infusion or lacto-fermentation, and very occasionally freezing. But the best technique is the one detailed here. What you are creating will be high enough in salt that it becomes a substitute for that when used in a dish. In much the same way that one would use a seasoned salt, or a curry paste, or a pickled or fermented ingredient high in salt, you will want to taste your dish before adding any additional salt or salty ingredients like soy sauce to it. But a small amount of herbs preserved in salt can be used as the base for a vinaigrette or soup, added to a sauce, stirred in with dressing for a composed salad, added to the salt bill for curing meat or fish, stirred into a pasta with a bit of the cooking water, or used as the basis for a fresh salsa. Of course one could get even more creative than this, and luckily there will be plenty of time to–my herbs in salt mixes tend to last at least one year, some may linger even longer.

The recipe I use originated in a book called The Mediterranean Pantry by Aglaia Kremezi, and she uses US/Imperial measurements, always at a ratio of 6 ounces of vegetables for every 1.25 ounces of salt. This works out at a ratio of 4.8:1. For more precise measurement, I tend to use grams, and simplify the ratio to 5:1, but of course you can do as fits your kitchen and scale best. No matter what vegetable and herb components are used, however, the ratio should stay the same. This makes for 20% salinity, which means these herbs will likely stay fresh a lot longer than you. It is quite likely that a lower salinity would work fairly well too, but I tend to stick with this recipe as the color and taste stay so bright and fresh that I simply use the herbs as a salt substitute, and especially when added as the base for soups or stews the intensity of flavor is such that I feel I end up actually using less salt in the long run.

Absolutely any combination of herbs and vegetables is viable and I encourage you to experiment widely with this recipe, but I’ve included a few different iterations of it just as basic models. I always use a fine sea or other natural salt for this, such as Himalayan pink salt. Never use industrial salts like iodized table salt or kosher salt, and never use large crystals or rock salt unless you grind them first. Do not make the mistake either of combining the salt and the herbs and then processing, or you will wind up with more of a slurry than a condiment. In all cases, pack the herbs in salt well into 4 or 8 oz jelly jars (each recipe makes two of the former or one of the latter) and keep refrigerated. Should last at least one year, and often longer. Make sure that you integrate the salt well into the chopped herbs, tossing in a bowl several times before packing into the jars.

IMG_1901.jpg
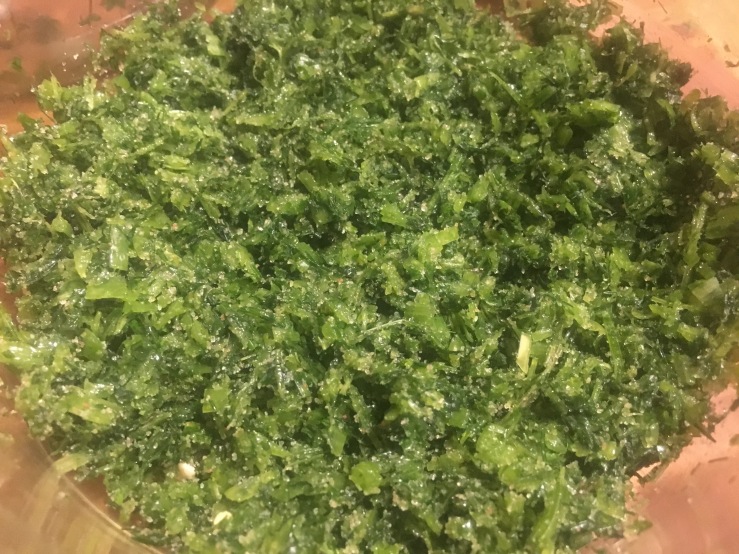
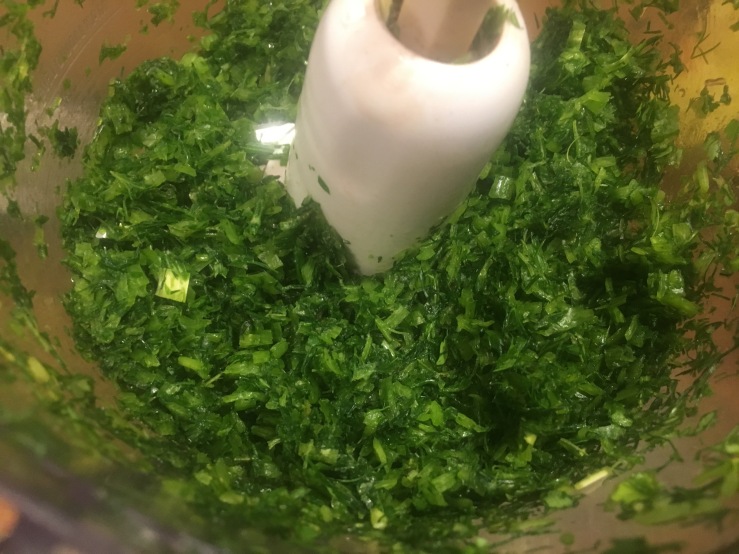
almost, but not completely done pulsing cilantro, wild chervil and leeks

Cilantro & Leek

chop extremely fine by hand or pulse in a food processor:

160 g chopped cilantro

40 g chopped leeks

mix in:

40 g fine sea or other natural salt

Parsley & Dill or Fennel Frond & Leek

hop extremely fine by hand or pulse in a food processor:

100 g chopped parsley

60 g dill or fennel fronds

40 g chopped leeks

mix in:

40 g fine sea or other natural salt

IMG_1902.jpg
herbs combined with salt, ready to pack into jars

Bittercress, Dandelion & Field Garlic

I make this in spring when all three herbs are at their finest and I can collect them from my yard. This combination of herbs also makes an excellent base for pesto. Make sure that you use a food processor if using field garlic, and that you snip it very fine first as it is quite fibrous. The same can be said of chives

chop extremely fine by hand or pulse in a food processor:

100 g bittercress (Cardamine species)

60 g dandelion greens

40 g field garlic greens or chives

mix in:

40 g fine sea or other natural salt

Waterpepper & Shiso

The sharp intensity of waterpepper (one of the flavorful smartweeds will work too) is balanced by the distinctive herbaceous flavor of shiso. Both grow abundantly in my area as invasives, and I make this in mid-summer before both plants begin to flower.

chop extremely fine by hand or pulse in a food processor:

80 g shiso (Perilla frutascens) or thai basil

80 g waterpepper (Persicaria hydropiper), smartweed or rau ram (Vietnamese coriander)

40 g field garlic bulbils or leeks

mix in:

40 g fine sea or other natural salt

Red Spicebush Curry

IMG_8905.jpg
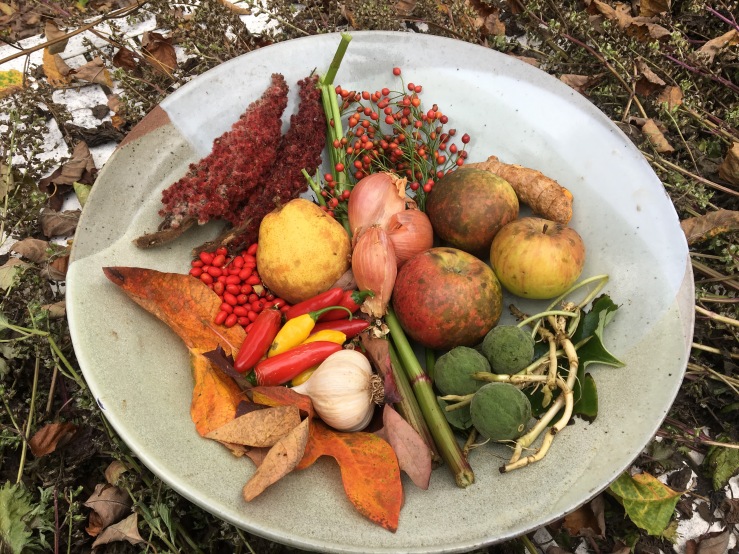
Some of the many possible ingredients to make a red spicebush curry – on the left are the only two essentials : fresh red spicebush berries and red chiles.

Spicebush is a versatile spice, whether dried or fresh. One of the best ways to experience that versatility is by making fresh spicebush berry-based curry pastes. In late spring and early summer, the fresh green berries can be combined with green chiles and aromatics to make a green curry paste. The most pronounced flavor change occurs in the berries when the seed emerges in mid-summer, inside the bright green fruit. Once the color change sets in the berries can be gathered and combined with red chiles to make a red curry paste.

Neither of these will taste identical to the classic green and red Thai curry pastes, unless you use only the traditional aromatics rather than wild ingredients. If you want to make an authentic Thai curry with spicebush as an added aromatic (and I can find no fault at all with that idea!) then you will be better served by simply adding some spicebush berries to a traditional recipe. My non-recipe recipe, which follows, is much more open-ended and designed to let you work with whatever native or imported, cultivated or wild  seasonings and aromatics you might have on hand.

This approach is one of proportions and seasonal, available ingredients. It changes every time I make it, and can include many different aromatics depending on what I have at hand and what I have in mind to use the curry paste with.

Combine in a food processor or mortar :

1/4 cup red spicebush berries, fresh not dried

4 oz red chiles, destemmed and deseeded (I don’t really care for my spice pastes to be super-hot, so that I can add fresh chiles or other hot spices to my final dishes. If you prefer a more traditionally hot paste, double the amount of chiles and use 8 oz.)

1 oz turmeric root or substitute turmeric powder at time of cooking

6 oz alliums and aromatic stalks and/or roots in any combination that makes sense to you : garlic, ginger, wild ginger, galangal, wild carrot root, wild parsnip root, angelica stems, lemongrass stalks, shallots, and leeks or spring onions are all viable options. (an example of how this breaks down from a recent version of this : 2 oz angelica stem, 2 oz shallots, 1 oz garlic, 1 oz wild ginger)

4-6 oz feral or cultivated apple or pear, or combination of apples and pears, and if desired other mealy/juicy rose family fruits such as hawthorns or rose hips. (optional – i add feral fruit generally just to thin out a paste if it is too heavy, or if I intend to use the paste primarily as a grilling medium)

2-4 tbs dried spices, cultivated or wild seeds, two or more of : cumin, coriander, wild carrot, wild parsnip, pushki, black or wild mustard, fenugreek, etc. Any wild or cultivated seeds that you would use in a dried curry mix are good to use here. I generally follow the ratio (used in many traditional masalas) of combining equal parts cumin and coriander seed, accented with smaller amounts of other spices. In lieu of coriander I often use one of the wild carrot family members whose seeds have a “coriander-like” quality. In my area those are wild carrot, pushki and wild parsnip.

1 tbs ground sumac (optional)

handful of turning sassafras or spicebush leaves (sassafras will be yellow, orange or red, spicebush yellow) (optional)

grated zest of chinese bitter orange (Poncirus trifoliata), kaffir lime or other citrus (optional)

1 tbs shrimp paste (optional, but adds intense depth of flavor and that oily ring of authenticity)

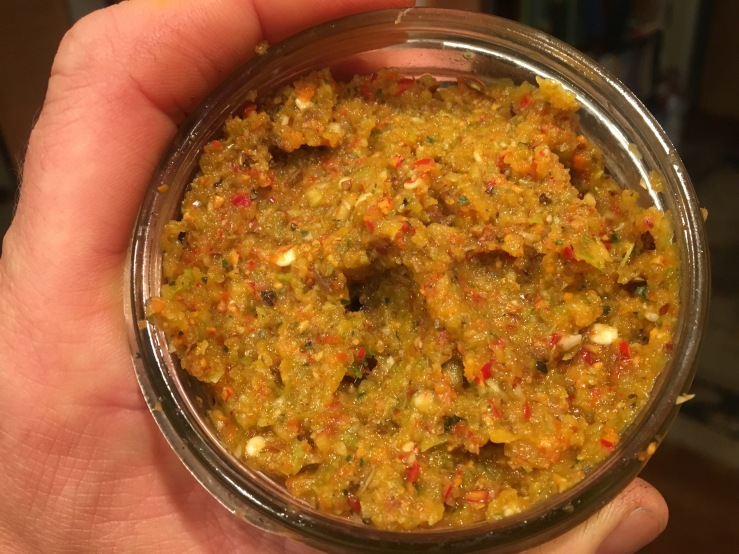
Process until smooth. A food processor is the easiest fix for this, but I recommend chopping into small pieces most of what you add. Cloves of garlic should be crushed. Dried leaves should be crumbled. Stringy things like leeks, angelica, or lemongrass should be cut into small pieces across the grain. If you want to prepare this more traditionally, a mortar and pestle works fine with a bit of pre-chopping and patience. I don’t mind a coarse grain with this, as is obvious from the picture below, but you can go coarser or finer as you like.

Red spicebush curry paste will store in the fridge for a few weeks, but I recommend putting recipe-size batches in small jars and freezing them.

IMG_9062.jpg
The color of red spicebush curry paste is generally a bit more orange than red.

As to using this concoction? Certainly any traditional recipe which calls for a Thai red curry paste can be made, substituting this. The flavor will of course vary from that of the traditional, but the results will doubtless be delicious.

I prefer to use my curry pastes, especially if I have loaded them with native or locally-grown ingredients, with local vegetables, seafoods and meats. I particularly enjoy the red spicebush curry paste with autumnal and winter vegetables like squash, beets, potatoes, leeks, evening primrose and other root vegetables. Shrimp and squid are fantastic grilled in the paste, with a little miring or vinegar or chile sauce added to thin out the mix. Fantastic curry soups can be made with lentils, sweet potatoes, and so on, simply cooked in broth and pureed with curry paste. I find it works equally well thinned or mellowed with coconut milk, broth, yogurt, or wild bark teas. A simple vegetable dip fit for the gods can be made by combining spicebush curry paste, miso and homemade yogurt.

IMG_9100.jpg
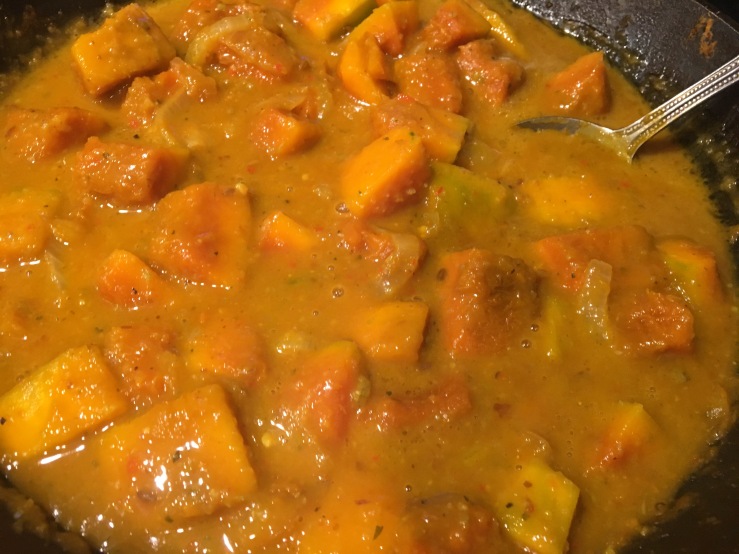
A curry of blue hubbard squash with red spicebush curry paste. 

Boullion of the Woods

IMG_5339.JPG
BOTW before grinding.

If you’re a mushroom forager, Chicken of the Woods (Laetiporus spp.) aren’t really the first fungi that spring to mind when thinking about drying the harvest. Indeed, the appearance of a slightly-too-far-gone specimen is something of a wild food cliché, sometimes accompanied by gags of the “no spring chicken” variety. Hilarious.

When they are fresh, it is their tenderness, as well as their flavor that encourages comparisons with poultry. Newly-emerged Laetiporus can be stir- or deep-fried to resemble chicken breast meat to a very credible degree. When they are still fresh but not quite as soft, I can still deep-fry them or use them in a slow-cooked dish with great results. They can also be used at this point, and perhaps a little further along, to make a great mushroom and herb powder that substitutes quite handily for powdered or cubed chicken bouillon.

First, the mushrooms should be dried in a dehydrator or by placing on wire racks in a place with a great deal of air movement and not much humidity. Once they are dried quite thoroughly they can be made into the BOTW or left in glass or plastic jars bags until ready to be ground. You will get the most optimal results by using the freshest mushrooms. If the fungus is really quite dry when you encounter it, it may already have lost too much of its flavor to be saved. If you prepare this, also try the test mentioned below and see if the flavor is adequate.

Combine in a food processor :

4 oz. dried chicken of the woods mushrooms (Laetiporus spp.)

2 tbs good-quality sea salt

1/4 cup dried wild bergamot (Monarda fistulosa) leaf

2 tbs dried sweetfern (Comptonia peregrina) leaf

Pulse and then process until the product resembles semolina or corn meal.

IMG_5336.JPG
Ground BOTW.

To test the flavor, dissolve a small amount in a coffee mug full of hot water. If the flavor resembles chicken broth, you’re good to go.

As far as substitutions, you can use oregano in lieu of wild bergamot, and perhaps thyme or bay leaf in half the quantity listed to substitute for sweetfern. The flavor won’t be exactly the same, but should still serve amiably.  You may wish to add more salt to more closely approximate dried chicken bouillon (which is extremely salty), but I usually find it more helpful to add salt to the dish directly, leaving this powder with just enough salt content to use as a broth base without making it too salty to add to dishes with abandon.

Texture of the ground powder is a consideration. I like to leave it a bit coarse, even allowing for the occasional lentil-sized nugget of Laetiporus to go unground. These larger bits can always be strained out of a broth later if I am looking for consommé-like refinement. More often I am using BOTW to add to meatballs or stews, or as a base for a ramen bowl. In these cases, small chunks of mushroom are a bonus rather than a hindrance. If you prefer it finer, simply grind until it is as fine as white flour.

IMG_5342.JPG
Ramen made with BOTW, shredded parsley root, cooked leeks and parsley root leaf.

To use as a soup base (it makes a lovely ramen powder), use 1 tbs to 2 cups of water. You can also use it to enhance a tired or weak broth by adding in the same ratio or slightly less. Be careful when adding to quickly-boiling water or broth, as the BOTW will make the hot liquid tend to foam vigorously if the heat is too high. The coarser the grind, the more likely you are to use it as a substitute for breadcrumbs in dishes with good success. In a heavily-breaded dish I may add a couple of tablespoons of BOTW for every cup of panko or breadcrumbs.

There are a myriad of other uses for BOTW, from adding to soups or stews to savory bread and pancake mixes, or adding to liquid sauces which will be strained in lieu of broth. The powder is relatively low in salt, so can be used as a lower-salt substitute or liason for dishes in which savory flavor is called for but salt must be kept to a minimum. BOTW can also substitute in any recipe that calls for ground dried mushrooms or mushroom powder. Bear in mind its’ salt content while using, and increase or decrease the salt content in the initial grind accordingly.

As I post more recipes using this handy kitchen helper I will post them here, for now :

Oyster Mushroom “Meatballs”


Forest Vinegar

IMG_9408.jpg
A late October scene in the Oak-Hickory Forest

Even for those of us who visit the woods nearly every day, there is something undeniably enchanting about a forest on a warm, clear day in autumn. I notice too, when I am in state and national parks that other people feel the same way. At no other time of the year are the woods so crowded. The aroma of the forest at this time of year is something truly special, the scent of fallen leaves and fungi, of pine needles and juniper branches filtering the autumn winds.

There are a number of excellent ways to capture this flavor, from pine family teas to juniper berry-laden pickles, bark and twig beers and wild sodas, and jams and sauces made from late-season fruit. The autumn is prime harvest time, with drying racks laid on every surface to preserve mushrooms and herbs, fruits and nuts. One of the best ways to incorporate this pantry of wild foods into everyday-use items is to make an infused vinegar. Single-ingredient vinegars are of course a perfectly fine way to experiment with flavors, but to me nothing beats an complex medley of seasonal flavors infused into a good cider, apple scrap or wine vinegar. At its’ best a forest vinegar is nuanced and sophisticated, and can lend a unique flavor and touch of personality to foods as diverse as your everyday salad, a jar of pickles, a marinade, or a finishing sauce.

I am going to present this recipe in two ways, first as an example of one of the forest vinegars I have made, second as a simple list of seasonal ingredients to experiment with, with a number of suggestions as to bases. You should feel free to experiment pretty widely with infused vinegars, just remember a few basic rules :

1. Sterilize your infusing vessel, and keep everything submerged while the flavors are infusing.

2. You may find a mother forming on the vinegar, like a kombucha SCOBY. This is natural and even desirable. You may also notice fermentation activity if you use ingredients that have wild yeast, such as juniper berries. This is fine, and generally dies off after a bit. I would suggest not overloading a vinegar with too many yeast-bearing ingredients to avoid an excess of activity.

3. Don’t overload the infusion with ingredients, allow for some space for the liquid to circulate and the flavors to mix thoroughly. I have tried using large quantities and shorter infusing times and the flavors come out strong but less-integrated. The longer these very disparate materials spend in each others company, the more they will rub off on each other and create a complex harmony of flavor.

4. Know when to strain. Strain when your tastebuds tell you to strain. Don’t hold out for the promise of more flavor, especially if you have a concentration of bitter ingredients. Bitterness develops over time–a good example would be the chinese bitter orange (Poincirus trifoliata), which makes an excellent vinegar but will turn quite bitter if the oranges are left in for more than a few days. If you find the infusion beginning to taste too bitter for you, strain it immediately. Better to have a weak forest vinegar than one that is unusable.

5. Know the flavors of what you are using – don’t just chuck something in because it is cool and you know it to be edible. This is especially true of ingredients with strong or bitter flavors–a heavy concentration of things like turkey tails or juniper berries may overpower a subtle blend of other less assertive flavors.

The following recipe makes a great batch of vinegar, and is a good starting point to experiment with. If you’re a total novice but can assemble the ingredients, it’s a safe and stable recipe to use as is. As you become more familiar with ingredients, and fine the ones that grow locally to you, it’s a good basis from which to add or remove ingredients as whim and season dictate. Because I am posting this in Winter, I’ve chosen a recipe which uses only ingredients which are still fairly available or were dried in late autumn (the mushrooms). The oyster mushrooms can be store-bought or you could even use conventional mushrooms, they are present mainly to round out the flavor of the stronger turkeys tail.

IMG_0997.jpg

Forest Vinegar #3

Combine in a large jar :

2 oz toasted hickory bark, broken into pieces

1 oz pine needles, cut into pieces

1 oz spicebush twig, broken into pieces

1 oz hemlock branches, cut into pieces

1/2 oz dried oyster mushrooms

1 oz dried turkey tail or dryads saddle mushrooms

1 1/2 oz rosehips from Rosa multiflora or cultivated rose

6 cups apple cider or apple scraps vinegar, homemade or good quality (look for brands with “the mother” like Bragg’s)

Cover and keep ingredients submerged, shake or stir regularly and allow to infuse until the flavor is to your liking. I usually allow at least three weeks to infuse this combination, you may also find that it infuses faster or slower depending on ambient temperature.

There is really no limit to what can be added to these vinegars, and below I’ve included two lists of seasonal ingredients that are often available in my location (Northeast US). Obviously some of these may not persist in winter in some locations, but in general even faded or dormant edible plants can provide useful flavors. A handful of worn and weathered mugwort flowerheads in December or some brick cap mushrooms past their prime can often bring a subtle flavor to infusions that might be overwhelming were the parts used when in the full bloom of their season. The key here is to work with small amounts of various ingredients to create subtle effects, never allowing one flavor to dominate the proceedings. Remember that strong-flavored ingredients create strong-flavored results. This list is by no means exhaustive, just a jumping-off point really.

IMG_1002.jpg
Another late-autumn Forest Vinegar, with bayberry leaf, juniper cone, sweet birch twig, sassafras root and birch polypore fungus with other aromatics.

Winter ingredients for Forest Vinegar

Roots (sassafras, wild carrot and parsnip, burdock, pushki, smilax)

Needles & Branches (pine, spruce, fir, hemlock, arbor vitae)

Twigs (sassafras, spicebush, sweet birch)

Fungi (turkey tail, birch polypore, oyster mushroom, wood ear, brick cap, velvet foot, chaga)

Fruits (LInden viburnum, blackhaws, juniper, crabapples, persimmons, cranberries, Highbush cranberries)

Leaves (wild chervil, garlic mustard, northern bayberry, deadnettle, ground ivy, bittercress, wintergreen)

Persistent dried tops of autumn-flowering aromatic plants (mugwort, wild carrot, goldenrod)

Autumn ingredients for Forest Vinegar

Including most of the above, plus :

Fallen Leaves (beech, maple, mulberry, oak, black walnut)

Fungi (too many and varied to list, but boletes, oysters, dryads saddle, and resinous polypore are all good for flavoring vinegars)

Fruits (apples, pears, silverberries, paw paw, persimmon, bitter orange, quince, spicebush)

Leaves (wild bergamot, northern bayberry, mugwort, wild carrot, pushki, dandelion, asiatic dayflower, quickweed)

Flowers (goldenrod, evening primrose, chicory, wild mustards, new england aster)

Seeds (pushki, wild carrot, nettle, evening primrose, wild mustards)

Bayberry Salt

Flavored salts are an excellent way to make use of some of the wild spices that are available to intrepid gatherers. Various fruits, cones, nuts, mushrooms and leaves can be used, anything that can be dehydrated and combined with salt. This often helps preserve more unstable wild spices, and prolongs the life of their flavor beyond the season of their emergence. A good example of this would be hemlock salt, in which the green cones of Eastern Hemlock are combined with salt to preserve the unique, robust, citrus-y flavor they possess in their green state.

Bayberry leaves are available almost year-round, so preserving them isn’t at a premium. The leaves do tend to grow dark and unappealing in winter, although they may linger on late in warm winters or coastal locations (see photo below). The leaves of Myrica pensylvanica and other Myrica species are often mentioned in field guides and foraging books as a substitute for bay leaves (i.e. the Laurel Bay, Laurus nobilis). While this is certainly an option, I’m not a huge fan of “substitution” as a principle for utilizing wild food. I would prefer to exploit the flavors of the ingredient itself and craft recipes that reflect that flavor.

To my taste buds, Myrica leaves have a more complex and “bright” flavor than Laurel bay, with a less pronounced potency. In other words, if you’re substituting for Laurel leaf in a recipe, double up the amount of Myrica leaves used. If you are just enjoying them on their own merits, the following seasoning salt is a far more effective method. This is one of my go-to salts, perhaps the go-to salt, although juniper, black trumpet, roasted tomato and hemlock salts all get an enthusiastic nod for adding to dishes in lieu of ordinary sea or kosher salt. But bayberry leaf salt seems to be the crown prince of them all, serving as a final sprinkle to dishes instead of salt and pepper, but also being used in recipes themselves. In spring I roast whole chickens sprinkled with bayberry salt, after slipping pushki leaves under the skin. In the fall, grilled mushrooms and onions explode with flavor given a simple dusting of the stuff. You get the picture.

Grind together in a food processor :

6 cups bayberry leaves, dried

1 cup salt, preferably sea salt

Store in a well-sealed glass jar at room temperature. Lasts at least one year.

IMG_2978.jpg
Some Northern Bayberry still clinging on in a coastal location in January.

Nearly Wild Curry Mix

IMG_0914.jpg

Curry powder always seemed to me a shabby thing to buy, it being so much more interesting to work with the whole spices themselves. I was spurred on by one of the first cookbooks I ever bought, a collection of recipes and information about spices published to sell the goods of a local spice importer. By understanding the spices individually, I was able to experiment with them culinarily, adding more or less to a mix depending on what I intended to do with them. Cardamom and cloves, for instance, could be added if I was using a mix to spice tea or desserts with. I would add more dried curry leaves and turmeric when making a mix for fish.

When I began to seriously incorporate more of the native and invasive wild spices of the world of wild food, it wasn’t a great stretch of the imagination to start to envision a masala or curry mix made entirely of foraged aromatics. And while an excellent entirely wild curry mix can be made, I usually find that I miss the cumin acutely. For day to day use and especially when replacing imported curry powder in traditional recipes, I have settled on a curry mix that is “nearly wild,” relying only mainly on foraged ingredients. It is also quite flexible, and may be adapted, altered or expanded by anyone who uses it, with many replacements or omissions possible. I believe it can be used in most temperate climates without too much trouble, assuming the availability of traditional imported spices to replace what cannot be foraged.

I have omitted any turmeric or substitute for turmeric in this recipe. To many, the taste and color of curries cannot be separated from that spice. Now that organic fresh turmeric is much more widely available, I use it in these curries, when it can be added at the time of cooking. You may wish to add that or the powdered form to affect a more traditional coloration. I sometimes add annatto seed instead for “local color,” but of course the color is a different one. Below is the recipe, see notes after the recipe for information on substitutions. I have deliberately split the list of ingredients into three groups.


Combine :


1 ) essential bases

1 tbs. black mustard seed (wild or domestic)

1 tbs. cumin seed

1 tbs. wild parsnip or pushki or coriander seed

1-2 tsp wild carrot seed (optional, omit if using coriander seed)


2) optional aromatics

2-3 northern bayberry leaves or 1-2 bay leaves or 8 curry (kari) leaves

1-2 tsp ripened (red) spicebush berries, dried or 1/2-1 tsp allspice

1-2 magnolia buds, dried or pinches of magnolia leaf or 1 clove

1 tsp american juniper berries or 1/4 tsp european juniper

1-3 eastern hemlock cones


3) “hot” or piquant aromatics

1-2 tsp prickly ash berry or sichuan peppercorn

1-3 tsp waterpepper seeds (or 1/2-1 tsp black peppercorns)

1-2 tsp chile flakes or 1-3 small dried hot chiles


Combine all the above in a heavy pan and heat over low to medium heat, tossing every thirty seconds or so, until the spices are toasted and fragrant. You can also store the mix, combined and use as whole spices in pickles or broths, or toast and grind it to order, which will give the best flavor. My only advice would be to use the whole recipe when grinding or using to infuse, as the many different-sized and shaped ingredients tend to separate themselves in the jar.

The trinity of mustard-cumin-wild parsnip is essential to this mix, nearly everything else can be omitted or varied. If using domesticated mustard seed, the variety to use is the brown or black mustard seeds preferred in Indian cuisine. Wild mustard genera which produce seeds that can be used for this include Brassica, Lepidium, Barbarea, Thlaspi, etc. Wild parsnip or pushki (Heracleum maximum, other edible Heracleum species can be substituted) seed, along with wild carrot seed all bear some resemblance to family member coriander. Pushki and wild parsnip have a drier, earthier flavor to them while wild carrot is spicier and lightly citrus-y. Always remember to avoid wild carrot seed if pregnant or desiring to become so–while I doubt that the small amount involved would have much effect unless consumed in massive quantities, wild carrot seed is traditionally considered an abortifacient.

The second group of aromatics are all wild but any can be omitted or substituted with the imported spices listed, with the exception of hemlock cones, which really have no parallel. If there is one wild spice in this group that I would strongly recommend investigating (and not replacing with allspice, which is a paltry substitute), it is spicebush. Native to the eastern US, it is a native understory tree which produces a green berry in summer that matures to a deep red in autumn. It is resinous and pungent and can be used ripe or unripe, fresh or dried. It has become inseparable from various curry mixes and is the most distinctive background player in this recipe, in my opinion.

Heat can be regulated by adjusting the last group of ingredients, which is in part why I have left a range for those items. I would describe this mix as moderately spicy, but not extremely so, even if using the larger numbers and including all three hot items. For a heavier spice, simply add more of whichever piquant aromatic you prefer.

Hickory Syrup

IMG_6322.jpg
Hickory syrup is golden, smoky, beautiful and has legs for days…

The Hickory is a characteristically American tree, an irreplaceable member of the great deciduous forests of our continent. It is most known to those with only a casual interest in native trees as the genus which contains the Pecan (Carya illinoinensis), but there are a number of species of Hickory tree which are found, not commonly, but regularly in the woodlands of the Eastern half of the US. The mature stage of eastern hardwood forests is commonly referred to as the “oak-hickory forest,” underscoring the importance of this native tree.

Wild food gatherers will of course be familiar with the Hickory in the form of its edible nutmeats, gathered in the autumn as the nuts drop in their (usually) smooth green and segmented outer shells. While all hickory nuts are technically edible, not all species conform to what we would consider palatable. Within that window of taste, there are also variances from tree to tree. One of the most widely distributed and appreciated for both beauty and flavor is the Shagbark Hickory, Carya ovata.

IMG_3961.jpg
Mature shagbark hickory with its characteristic “shaggy” strips of exfoliated bark.

In addition to providing delicious nuts, the shagbark hickory has a bark which can be used to add flavor to smoked or grilled foods, in the fashion of other hardwoods such as apple, cherry and mesquite. Excitingly for our purposes here, it can also be used more directly, in the form of a tea which can be turned into a sugar syrup. This product of the hickory is often likened to maple syrup, but it is different in some fundamental ways. First of all, maple syrup is a natural product which is extracted from the natural sap of trees by a somewhat laborious process. Second of all, maple syrup tastes quite different from hickory syrup. So perhaps not such a great comparison. In terms of use, however, there is a certain similarity – hickory syrup can be substituted for maple syrup in both direct use and in recipes, with of course the knowledge that the flavor will be that of hickory, not maple.

I quite like maple syrup. I don’t wish to demean it in any way. But, to me, hickory syrup tastes better, and is far more interesting culinarily. Those who find maple syrup good but somewhat cloying may agree with me. Hickory syrup has an incomparable smoky, woodsy flavor that is a more complex than maple syrup, something which to my tastes makes it more useful for both sweet and savory recipes. Maple syrup is delicious, but hickory syrup is adventurous. The only flaw that I see is that the manufacture of hickory syrup relies on an outside product to sweeten it, in most cases cane sugar, which is of course an industrialized, tropical plant and carries with it a cost in terms of ecological impact. In its defense I will say that making hickory syrup is one of the best ways to use sugar, a product I generally avoid. And while the amount required is no more or less than one would use to make a simple syrup, the product is one that carries a huge amount of flavor in even small doses, especially when used in cooking and baked goods. Maple syrup is also quite expensive in terms of money if one buys it, and time if one makes it. Making hickory syrup is quick, simple and costs nothing more than the price of whatever amount of sugar one uses.

To produce hickory syrup, one first needs to locate a shagbark hickory tree. The shagbark is quite distinctive, having naturally exfoliated bark which hangs “shaggily” off the tree in large, easy to remove pieces (pictured above). This bark can be collected in any season, but I usually gather it in winter when other wild food options are reduced. First, I scout around the base of the trees I find to see if any strips have fallen to the ground. There is no direct harm done to the tree by removing its bark, but one does run the risk of exposing the inner bark to attack from insects (another reason to collect in winter). It also reduces the natural beauty of the tree, so I try always to take only a few strips from each tree and minimize the impact both ecologically and visually. It does not require a great quantity of bark to make a rich syrup, so I would recommend starting with just a few ounces and seeing how well you like it.

IMG_0512.jpg
Toasted shagbark hickory bark, ready to be made into a syrup.

To prepare the syrup, you will want first to toast the bark in a low oven. This works on the same principle as dry-roasting spices before using them in a curry. The heat brings out flavors and aromas in the bark which would be less intense if the bark were not treated in this way. I have made hickory syrup without toasting it first, and it is perfectly serviceable, but not as deep in flavor. To toast the bark, place on a baking sheet in a low (under 200°) oven for 1-2 hours or a slightly hotter one (325°) for a half-hour or so. When I use the higher heat method I turn the bark halfway through. I’m not entirely sure that this is necessary, I am likely just being fussy.

Once the bark is toasted, allow it to cool and then prepare a tea from it. I generally use a ratio of 4-5 ounces of dry bark to 6 cups of water. Bring close to a boil, then cut the heat and allow the bark and water to simmer until the amount of water (now dark and flavorful) has been reduced to a third of its original amount. The amount of time this takes will vary greatly, so the best way to proceed is simply by measuring, reducing, and measuring again until one gets the liquid down to a third. I have prepared this tea with amounts as small as 2 oz of bark and as high as 1.5 lbs and found the general ratios to be effective in both small and large recipes. To make a practical, easily bottle-able amount the most usual proportion that I prepare is 8-10 oz. of bark to 12 cups of water, reduced down to 4 cups of tea. Avoid boiling, which will result in bitterness. It is perfectly acceptable (and perhaps beneficial) to allow the mixture to sit until cool, for several hours, or even overnight before straining the bark. When done, do not discard the strained bark. Instead, save it and use for additional flavor when grilling or smoking foods with hardwoods.

IMG_7879.jpg
Hickory syrup being reduced. The color will vary from pale gold to reddish amber.

Next, you will want to add sugar. I prefer to use a proportion of 1 : 1 to make the basic hickory syrup, and then reduce it if I want a more concentrated and thick product (I usually refer to this as hickory glaze).

To make a hickory simple syrup, rather than a glaze, all one has to do is combine the sugar and tea over a low heat until the sugar dissolves. It is best to avoid stirring this mixture as it begins to get warm, as this will cause crystallization. This syrup will not be as thick as maple syrup, but is perfectly fine for most applications and is actually much better if you are going to add hickory syrup to drinks or use it in a recipe that will be cooked for any length of time.

Reducing the syrup to a glaze is more useful if it will be used to make salad dressings, added to dishes as a finishing touch, or poured over pancakes like maple syrup. I tend to reduce the syrup by anywhere from a quarter to a third, so going from a cup of hickory syrup to 2/3-3/4 cup of hickory glaze. I have found that reducing it much further results in a product that solidifies at room temperature. There is nothing much wrong with this thick syrup, it just requires heating in a water bath to become fluid again.

As to the uses of either hickory syrup or glaze, the only limit is one’s imagination. Of course it works wonderfully as a substitute for maple syrup, but don’t let your experimentation end there. Hickory syrup makes an amazing addition to various mixed drinks and cocktails, alcoholic or not, and is an ideal sweetener for lemonade or sumac-ade, adding its characteristic smoky flavor to the mix. It’s fantastic when substituted for honey or maple syrup in baked goods, makes a great base for vinaigrettes and yogurt dressings, and is inspiring drizzled on homemade ice creams and frozen yogurts. The combination of smokiness and sweetness means it pairs excellently with meats, especially pork sausages, bacon, and fried chicken. My favorite way to use it may be as a finishing touch to bitter greens, of which I eat quite a lot. And it almost goes without saying that it is an awesome pancake syrup.

It’s extraordinarily easy to identify shagbark hickory and make this syrup – there is an added bonus to collecting this bark in the winter, as well. Identifying hickory trees now means one can be there in the fall, when their nuts are available, for the shagbark hickory is one of the consummate wild foods, under appreciated in our area where they are so naturally abundant.


Tuong ot toi (Vietnamese chile-garlic sauce)

image1 (2)

Combine in a food processor :

24 oz cherry bomb or fresno chile peppers, or other medium-hot to hot red chiles, destemmed but not deseeded and cut into quarters, halves or chunks as appropriate

1 head garlic, crushed and peeled

a pinch or two of salt

Pulse until chopped into smaller fragments, stopping to scrape and redistribute if necessary.

Add :

2, 4 or 6 tbs sugar (see note)

1/4 or 1/2 cup seasoned rice wine vinegar (see note)

Process until chile and garlic and finely enough diced. Place in medium to large saucepan over medium heat.

Bring to a simmer and cook at a low simmer until the liquid has mostly evaporated.

Allow to cool, then refrigerate and serve with EVERYTHING.

Note on proportions :

It’s best to play with the proportions of this recipe to suit you or your fellow diners taste. In particular sugar and vinegar should be tweaked : 6 tbs sugar makes something close to what is purchased in asian markets as shelf-stable tuong ot toi, 2 tbs is more like what would be served on the table at a restaurant. The larger amount of vinegar will make it take longer to cook and reduce but easier to process everything initially. And naturally it will make it more sour. I usually use 2 or 4 tbs of sugar and 1/2 cup of vinegar.

Ideally, you should play with all the other proportions as well, and even what kind and color of chiles to use, to suit yourself and your diners, and the dictates of the moment. I often replace 4 oz or so of the red chiles with green chiles, it ruins the impressive red majesty of the original, but it reminds me of when I used to buy it in the Asian market, where there is usually a bit of green since the peppers are pulled in big farms and often still have a hint of green. I used to think it was scallions 😐

This is undoubtedly the world’s finest table sauce. There is simply nothing finer in any cuisine that goes so well with so many cuisines and especially with so many simple foods. Raw and cooked vegetables, eggs, noodles, soups, sandwiches (unbelievable on banh mi), salads, tofu, pork, fish, and really pretty much anything is enlivened with a little dab of this. Butter, noodles and a spoonful of this with maybe a little cilantro would probably be my final meal if I had to have one. But I won’t! I will live forever, making millions and millions of batches of tuong ot toi! At least, that’s the plan.

Elderberry Syrup

image1

In a medium saucepan, combine :

1/2 lb. elderberries (washed, still attached to stalks)

1/2 cup sugar

1 cup water

Bring to a boil, crushing berries and sugar together. When the berries are smashed and the liquid begins to boil, cut heat, removing from burner if necessary.

Add :

2 1/2 cups sugar

4 cups water

Bring to a boil, then cut to a simmer.

Simmer for a half hour, then remove from heat, cover, and allow to sit for eight hours or overnight.

Crush again and strain all liquids through a cheesecloth into a syrup bottle.

Keep refrigerated.

Use as a base for sodas, dessert sauces, granitas, etc. Excellent combined in preparations with strong spices and herbs such as spicebush, black cardamom, ginger, wild ginger, shiso, monarda, cinnamon, star anise. Extremely refreshing on its own, with an almost perfect balance of sweet and tart.